Saturday, May 26, 2012

Grilled Corn on the Cob with Whipped Barbecue Butter


Ah, the wonderful smells of spring and summer...the abundance of fresh fruit and vegetables, does it get any better?  Of course it does!  The aroma of those fresh finds from the Farmer's Market doing their thing on the grill.  It doesn't end there, oh no,  jazz up your bounty and then spoil your self silly enjoying the wonderful tastes with those you love and/or enjoying being around.I found this Bobby Flay recipe some time back and it's a staple during the summer months when fresh corn is plentiful.


Whipped Barbecue Butter:

2 tablespoons Canola oil
1/2 of a small red onion, chopped
2 cloves garlic, chopped
1 tablespoon Ancho chili powder
2 teaspoons Spanish paprika
1 teaspoon toasted cumin seeds
1/2 teaspoon cayenne powder
1/2 cup water
1-1/2 sticks unsalted butter, room temperature
1 teaspoon Worcestershire sauce
Kosher salt and freshly ground pepper

In a saute pan, heat the oil over high heat until rippling and almost smoking. Add the onion and saute until soft, 1 to 2 minutes, then add in the garlic and cook for 30 more seconds. Sprinkle in the Ancho powder, paprika, cumin seeds and cayenne.  Stir to thoroughly combine and cook for 1 minute. Add the 1/2 cup of water and cook until the mixture becomes thickened and the water reduces. Remove from heat and let cool slightly.

Place the butter in a the bowl of a food processor, add the spice mixture and Worcestershire sauce and process until smooth. Season with salt and pepper, scrape the mixture into a small bowl, cover and refrigerate for at least 30 minutes to allow the flavors to marry. Bring to room temperature before serving and spread the butter over the corn while hot.

Grilled Corn:

4 ears corn
Kosher Salt

Heat the grill to medium.

Pull the outer husks down the ear to the base or completely off. Strip away the silk from each ear of corn by hand. If keeping the husks, (which I can't seem to do without ripping them to shreds my family prefers no husks) fold husks back into place and tie the ends together with kitchen string. Place the ears of corn in a large bowl of cold water with 1 tablespoon of salt for 10 minutes.

Remove corn from water and shake off excess. Place the corn on the grill, close the cover and grill for 15 to 20 minutes, turning every 5 minutes, or until kernels are tender or to desired doneness. A.J. we like ours a tad bit on the charred side.

Now, go forth and grill some produce!


Thursday, May 24, 2012

Life Happens...It's All Good

I received quite a few emails yesterday and today about my absence from blogging.  Ya'll are too much, I love it!  

Well kids, life happens and some things just need to be put on the back burner for a little while.  Sorry to say blogging was it for me.

As most of you know my mother passed away in the beginning of February.  After arriving back home from New Orleans from her funeral, A.J. and I were left with the task to cleaning out her condo plus all the little tasks such as address changes, cancelling utilities, insurance policies, credit cards, etc...  This took up every weekend through the first weekend of April.


We had a difficult time hauling boxes back and forth from her condo to a mini storage we rented and then to our house because A.J.'s truck was rear-ended and knocked into a gully.  He cut his head and hurt his shoulder and is still going through physical therapy.


A couple of days before A.J.'s little fender-bender, my youngest homegirl, Kaitlin, tore her ACL playing soccer and she had surgery during Spring Break.  She's doing great, sassy as ever!  Working hard to get back on that soccer field.  


Our next stop, Senior Prom.  Our eldest homegirl, Lauren, and her boyfriend at World's Fair Park in Knox Vegas...and don't you know it's all about the dress!  A.J. and I and our neighbors, who have two children the same ages as ours, had to go out to dinner that night and celebrate (drink excessively) and cry (drink excessively) because you know what?  These kiddos grew up way too fast.


This past Monday was bittersweet...Lauren went and graduated from high school on us.


Our niece and her husband drove up to share this celebration with us. We had a blast spending time with them this weekend.  It meant so much to all of us for them to be here. 


So what do you think; is Kaitlin happy for her sister or is she making plans to knock down a wall to make her room bigger?

So kiddos whether you make plans or not, life happens, but it's all good!

See you Sunday at the 3rd Annual East Tennessee Blogger Get Together at Larry's.  I'll be the one eating boil crawfish Cher!


Pin It 

Wednesday, May 23, 2012

Strawberry Kutchen

I found this recipe at Mary's blog, One Perfect Bite I want to say, about two years ago.  I know, slap me for not trying this sooner and blogging about it.  I wanted to slap me.  Mary made a Raspberry Kuchen and I used strawberries since that's what i had on hand.

Mary said this used to be called a "Poor Man's Cheese Cake" but it is officially called a Kuchen.  the Kuchen has a soft , cake-like, custard body and contains fruit.  I would love to try this with blueberries and blackberries.

This dessert is a winner on so many levels, the main one being it is very low-fat and it is not overly sweet.  The Kuchen can be made with fresh or frozen berries, but since it's the beginning of summer, use fresh berries, baby!

Here's the Cast of Characters:

BASE:

1 cup all-purpose flour
1/2 cup sugar
1/8 teaspoon salt
1 teaspoon baking powder
1/4 cup butter, melted
2 egg whites
1 teaspoon vanilla

2 cups fresh or frozen berries (I used fresh strawberries)

FILLING:

1-1/2 cups plain low-fat or non-fat yogurt
2 tablespoons all-purpose flour
1/2 cup sugar
2 slightly beaten egg yolks
1 slightly beaten whole egg
1-1/2 teaspoons lemon zest
1 teaspoon vanilla

Preheat the oven to 350 degrees F.


Lightly grease the bottom and sides of a 9-inch springfoam pan.  If using frozen berries, thaw them to room temperature and drain.  In a food processor bowl or medium bowl, stir together 1 cup flour, the first 1/2 cup sugar, salt and baking powder.


Add melted butter, 2 egg whites and first teaspoon of vanilla.  Cover and process until mixed.


Spread on the bottom of the springfoam pan.


Sprinkle with berries and set aside.


For filling, place yogurt in a large mixing bowl, sprinkle with 2 tablespoons of flour.


Add remaining sugar, egg yolks, lemon zest and remaining vanilla.  Mix until smooth.


Pour over berries.


Bake for about 55 minutes or until center appears set when shaken slightly.  Cool for 15 minutes and remove sides of pan.


Cover and chill until ready to serve, up to 24-hours.


Berries and a low-fat dessert, it's going to be a great summer!


Friday, March 23, 2012

Parchment Bake by Mrs. Paul's and Van de Kamp's


As a part of the Tastemaker Program through Foodbuzz, I opted in to try out Mrs. Paul's and Van de Kamp's new product Parchment Bake.  They use 100% whole-fillet Tilapia in a sauce and seal the natural flavors and moisture in a parchment bag, similar to the technique used in restaurants.

Mrs. Paul's and Van de Kamp's was even kind enough to send a link
http://www.icebase.com/go2.shtml?1ewPyjLjOcybAJuQ/26add8deb3f8abc5/8f19c1755c06d3a9/kraucoin1@charter.net so my readers could get a Buy One, Get One Free coupon for this product.

The Parchment Bake is offered in three flavors at my local grocer:  Garlic Butter, Roasted Garlic and Classic Teriyaki.  Each fillet has only 80 calories.  So what's not to like? 

A.J. and I enjoy fish, the homegirlz not so much.  They happened to have other plans last Friday night, so I fired up the toaster oven and decided to give these puppies a try.


After reading the directions, I knew this would be a snap.  Place them on a baking sheet and pop them in the oven for approximately 18 minutes/We decided to try the Garlic Butter flavor first.


They came out of the oven all puffed up with steam and I knew the fish would be chocked full of flavor and would be incredibly moist too!


They were so photogenic.  After all we eat with our eyes first, don't we?


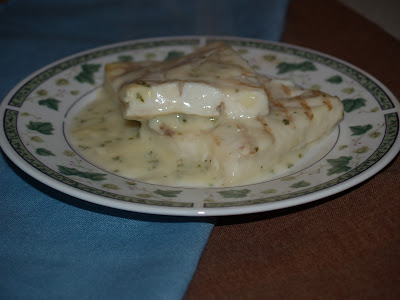
Look at all that dreamy, creamy sauce!

Ok, here's the skinny, BIG thumbs down.  Sorry folks, I'm not going to lie.  We both felt the sauce had very little flavor and the fish did not taste fresh at all.  It had a very fishy taste which neither of us care for.  

This completely took the wind out of my sails.

Have a wonderful beginning of Spring weekend!


Pin It

Thursday, March 22, 2012

The Better Chip...Really? Oh Yeah Baby, REALLY!


I've done a few product reviews and have never steered you wrong and won't start now.  Sean from The Better Chip contacted me and asked me to try a couple of samples of The Better Chip.  After trying all three flavors of these chips, he can certainly back up the name, The Better Chip!

Let me start off by telling you, these chips are all natural, low fat, gluten free, cholesterol free and low in sodium.  Now let me tell you about the best part, these chips taste fantastic!  In reading the literature Sean sent along with his product, I found that these chips are all made with 40% fresh produce.  Now what salty snack food can boast that much freshness?  The freshness comes through in the taste!  One other item that really intrigues me is the low sodium content, 6% per serving, but these chips remarkably have a wonderful salty flavor that I've come to expect in a chip.

Run, don't walk to The Better Chip website and find out how you can get your hands on a bag of your won, because baby, they are The Better Chip.


Pin It

Monday, March 19, 2012

Southwest Cheese Crackers and Blogger Party News!!!


A.J.  and I have been working the past several weekends and evenings getting my mother's condo cleared out.  she had stacks and stacks of recipes that she had either written down or have received from friends.  Talk about a task going through them to see what I wanted to try.  I found this recipe for Southwest Cheese Crackers and remember her making it years ago as a munchie before dinner.  I have no idea where she got this recipe, but it was meant to be found!  

Makes about 3 dozen

2 sticks of butter, softened
2 cups of grated white cheddar cheese
2 cups of flour
1/2 teaspoon of salt
1/2 teaspoon of cayenne pepper
1 can of Ro-Tel, drained

Preheat oven to 350 degrees F.  

Line a baking sheet with parchment paper.

Mix the cheese and butter together. Add the flour, salt, cayenne and tomatoes and stir until it becomes a ball.

For cookies, roll a teaspoon of dough into a little ball.  Use the back of a spoon to press it out into a little cracker.

To make the straws, Take about 2 teaspoons of dough and roll it between the palms of your hands to make little plump straws about 2 inches long. Poke a couple of holes with a fork on the top side of the straws.

Bake at 350 degrees for about 17 to 20 minutes.

Now about our 2012 Blogger Party.  I am so excited about this!  If you haven't attended our what has become an annual event, you need to make plans now to attend.  We have had so much fun the past two years, so Chris Grove, Larry Doolittle and I are pleased that we will be able to host a blogger party again this year.

Save the date... Sunday, May 27! This is Memorial Day weekend so now you have an extra day to travel, spend some time with your blogging buddies and enjoy beautiful East Tennessee!  No excuses, start making plans to your get eat on.


Bev and Larry are so gracious to once again hold our get together at their home near Greenback, TN and the menu will be a crawfish and shrimp boil – if you’re not a shellfish eater, come anyway bring what you like to eat and we’ll grill it for you.

Unlike previous times, we’ll be asking for a donation to help with the cost of the seafood.

We’ll send out more details in early April but wanted to get on your calendar now. We’ll be asking for an RSVP later, but so we can start our planning, please let Larry know now if you think you might join us – email grandpop1@yahoo.com.

Also please feel free to publicize this on your blog to reach more potential attendees, the more, the merrier.

We hope you can join us.


Thursday, February 23, 2012

BBQ Chicken Dip - Love in a Pyrex Dish!


I have taken my word verification off commenting since it has been such a pain in the backside for me and everyone else trying to comment on blogs.  If you have word verification on your blog, I am stopping by and enjoying your posts, but can't comment because I keep getting "Internal error" messages.

This mouthwatering dip that I lucked out and found at Plain Chicken while looking for fun tailgating food this past fall, will have your friends and family begging for more!  Torture them baby, you have to keep them wanting more so don't give up the recipe!  After all, some things, especially the really good food, should to remain a mystery. 

1 lb. bonesless, skinnless chicken breats, cooked and chopped
1 package softened cream cheese (8 ounce package)
3/4 cup your favorite BBQ sauce  (I used Sweet Baby Ray's Original)
1/4 cup Ranch dressing
1/4 cup sour cream
1 1/2 cups chredded cheddar cheese
1 green onion, sliced thin on an angle

Preheat oven to 350 degrees F.

In a mixing bowl combine chopped chicken, cream cheese, sour cream, ranch dressing, BBQ sauce, and 1 cup of the cheddar cheese.

Pour mixture into a lightly greased 8x8 baking dish. Top the dip with half og the green onions and remaining cheese. Bake for 20 minutes then sprinkle the remaining green onion over the top and bake for another 5 - 10 minutes, until bubbly. 


Allow to set about 10 minutes and serve with your favorite cracker or chip.  Now sit back, relax and watch the most fascinating disappearing act right before your very eyes!


Pin It