Tuesday, June 23, 2009

Blueberry Sour Cream and Coconut Cake

I wasn't going to post this cake, but Heather from Stuck on a Lunatic was showing her Mom my blog and her Mom saw a tweet I posted a couple of weeks ago about smelling blueberries baking. I had to post this for Heather and more importantly for Heather's Mom and I am also submitting this for BSI (Blogger Secret Ingredient). Reeni from Cinnamon Spice and Everything Nice is hosting this week.

First off, I need to apologize to whoever I got this recipe from. I have searched several blogs and can't for the life of me remember who gets credit for this recipe. Please let me know via comments or email and I will amend this post for your credit and please accept my apologies.

This recipe came from Bridget at Labella Cooks. Thanks for the shout out!

Let's get started on this cake...it's a perfect blend of coconut, blueberries and silky sweetness!


Toast 1/2 cup of shredded coconut. Heat your oven to 400 degrees, spread shredded coconut evenly on a foil lined pan. The toasting time varies from oven to oven. Check on it after 5 minutes and then go from there until the coconut is evenly toasted.
Once the coconut is toasted, lower the oven temperature to 350 degrees F.


In a large bowl, sift 2 cups of all-purpose flour, 2 teaspoons of baking powder, and add 3/4 of a cup of superfine sugar. i have to admit my ignorance, because I didn't know what superfine sugar is so I used powdered sugar.


In another bowl, combine 1 cup of sour cream, 2 large eggs, 1 teaspoon of lemon zest.


Combine wet ingredients with dry ingredients and fold in 1-1/4 cups of fresh blueberries.


Pour batter into a 9x9 cake pan.

Bake for approximately 40 minutes at 350 degrees F.


Allow to cool for 10 to 15 minutes, remove from pan and top with toasted coconut.


Just make sure you serve yourself the first piece. After all, you did all the work, you deserve it and it's the only way to get you to stop drooling.


Monday, June 22, 2009

Apple Pecan Cream Pie


My sister-in-law, Theresa, is the genius behind this dessert. Theresa made this for us a couple of weeks ago when we visited and chowed down on my brother John's tasty barbecue. I dreamed of this pie since Theresa served and she was kind enough to send the recipe along to me to share with you.
I know all of you have been working out and look so buff in your bikinis. Once you come in from the sweltering heat, you will be craving this easy to prepare, frosty creamy pie. It's just what the doctor ordered this summer!

You will need one graham cracker pie crust and one 21 ounce can of apple pie filling. Theresa likes this brand.

In a large bowl mix together the pie filling, 2 tablespoons of brown sugar, 1/2 teaspoon of cinnamon, 1/2 teaspoon nutmeg and 1/2 cup of pecans. Our grocery store had one pound bags of walnuts on sale, so I used 1/2 cup of chopped walnuts.
Pack half of the mixture into the bottom of the pie shell and cover and refrigerate the other half.
In an other bowl, whisk together 1 cup of half-n-half and 4 ounces of room temperature cream cheese until smooth.
Add in 1 small package of French Vanilla or Vanilla instant pudding and whisk until thoroughly blended.
Fold in 1-1/2 cups of whipped cream until well blended.

Pour into pie shell on top of apple mixture. Cover and freeze for at least two hours.
Top with the remainder of the apple mixture, thaw and serve. Refrigerate if you have any leftovers. You must make this pie, seriously, trust me.

Friday, June 19, 2009

Pepperoni Pizza Pasta

Am I the only only have blogger problems today?

I got the idea of this from Debbie at Mocha Me. Pizza is always a welcomed by the homegirlz and their mom is a pasta lover. So you see you can have the best of both worlds if you plot your strategy. Not only was this a really quick cooking week night meal, it was a real pleaser to the taste buds. This pasta meal has so many variations are only limited by your imagination. just think of what you like on a pizza!


Cook your favorite pasta in salted water and drain. While you're waiting on your water to come to a boil, in a large high sided skillet, over medium-high heat, add 1 tablespoon of olive oil and saute 4 slices of ham sliced in strips, 1/2 medium onion sliced in strips, 3 or 4 cloves of garlic minced through a garlic press and a couple of handfuls of sliced mushrooms.


Once the mushroom has started to turn golden brown, pour in one 10 ounce charge of pizza sauce and one 8 ounce can of tomato sauce and sliced pepperoni (as much as you want). Stir to combine and lower heat to medium low.


Add 1/2 cup of grated parmesan. Once pasta is cooked and drained. Pour into sauce and toss to thoroughly combine.


Top with shredded mozzarella cheese and sliced black olives and then watch it disappear.


Have a great weekend!


Thursday, June 18, 2009

Grilled Honey-Teriyaki Chicken

Do you ever feel like you're stuck in a rut? Have you ever panicked knowing you were going to make "some kind" of chicken for dinner but "what kind"? Well have your answer right here. This is one of Tyler Florence's Ultimate recipes and it is a keeper!

But ladies...you need to learn how to work the gas grill if you don't know how yet. Please don't say, "The grill is a mystery to me." or "That's my husband's department.". Gas grills are so simple to use and once you start cooking on your gas grill, you will see that it is a simple and fantastic time saving appliance. There is less clean up in the kitchen too!


First, we're going to brine the chicken. In a large bowl, add 1 cup of brown sugar, 1/2 head of garlic (unpeeled) 2 cups of water, 1 to 2 inches of ginger root (unpeeled, sliced in half lengthwise and smashed), 2 tablespoons of coarse salt, and 6 springs of fresh thyme. Gently stir to mix and pour into a re-sealable plastic bag. Add chicken. You can use a whole cut up chicken or I used 5 bone in, skin on thighs and legs. Seal the bag and refrigerate for one to two hours.


In a sauce pan, over medium heat, combine one 16 ounce bottle of teriyaki sauce, 1/4 cup of honey, 1 inch of ginger (peeled and smashed), 1/2 head of garlic (unpeeled) and 1 teaspoon of sesame oil. Simmer until rich and slightly reduced.


Remove chicken from brine, place in a bowl and pat dry with a paper towel. Season with black pepper and add a teaspoon of sesame oil. Toss chicken in oil and pepper and place on a pre-heated grill. Sear on each side and move chicken away from heat. Grill chicken for about 30 minutes, turning about every 5 to 7 minutes.


Baste the chicken with the teriyaki glaze in the last 10 minutes of cooking.


Serve garnished with chopped scallions.


Wednesday, June 17, 2009

Baked Tchoupitoulas

Thank you for your support and well wishes during my job search. I've had several interviews lined up these past several days, along with a lot of testing. I have three second interviews lined up the remainder of this week. The job search is consuming a lot of my time these days and I am also working on a few recipes for review with the possibility of publishing a cookbook. I'm trying to work on my posting this morning. This afternoon and this evening I am hoping to get caught up on your blogs. Wow, I miss all of you so much. Let's bake some fish!


Did I get you with the word "Tchoupitoulas"? Can we all say it together? Chop-pit-tool-us. See it's really not that difficult! Once you taste the flavors this dish renders, you will have no problem fitting Tchoupitoulas in your vocabulary!


Fish is a summertime staple. It's a blank palette where your imagination is your limit, plus it's a light and satisfying main course that most of us seem to crave during these warm summer months.


Did you know that A.J. has a green thumb? Yep, I think he can make a shoe grow. These are two of his tomatoes I picked to make this dish. Aren't they beautiful?
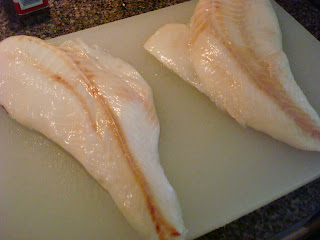


Two orange Roughy fillets were used. You can use any kind of sturdy fish, such as halibut, talpia and red fish.


Pre-heat oven to 350 degrees.

Line a baking pan with sides with foil and spray with a non-stick cooking spray. Chop 1/2 of a medium onion, 3 scallions, 2 ribs of celery and 2 tomatoes. Evenly spread the chopped vegetables over the bottom of the pan.

Thoroughly clean your fish and pat dry. Liberally season fish both sides with season salt, lemon pepper and garlic powder. Season ONE SIDE ONLY with a pinch of cayenne.


Place the fish on top of the vegetables in the baking pan. Lay lemon slices on top of the fish, overlapping slightly and sprinkle the top with paprika. Place the pan in the oven and bake uncovered for 1 hour.


Remove the pan from the oven and carefully move the fish fillets to a platter and tent with foil.


Pour the veggies and drippings into a pot and bring to a boil.


Once the drippings come to a boil, add in one cup of dry white wine. Allow the sauce to reduce by half over medium high heat.


Once the sauce has reduced, your kitchen will smell amazing...people will wander in, even the non-fish eaters, and start nosing around. Once the sauce has reduced pour the contents into a strainer over a heat safe bowl. Mash down on the veggies to force out all of the liquid. Discard the veggies and pour the liquid back into the pot.


Heat the sauce over medium-high heat and add in 4 tablespoons of cold butter cut into cubes. Add a 2 to 3 cubes at a time.


Add the cubes and very gently stir or swirl the sauce until the butter is melted before adding more cubes.


Whisk 1 tablespoon of flour into the sauce to thicken it slightly. Simmer sauce for about 10 minutes to cook flour.


Ladle sauce over fish and serve. Oh my, talk about mouth watering!


Thursday, June 11, 2009

Lemon Parmesan Risotto

There are so many ways to prepare Risotto, from adding in fresh herbs to adding in various cheeses, seafood and seasoned meats. It is so much fun jazzing it up, but I also like the simpler more basic flavors with lots of cheese of course!

The only downside to Risotto is it is addicting and goes straight to your hips! i have to walk five miles to undo the sweet damage. Risotto does require a little effort and some babysitting. Figure in this into your plan because you will be hovering over the pot for a good 30 minutes. Hey, you can burn a few calories stirring this before it ever hits your lips.

You will need:

1 cup of Aborio rice

3 cups of chicken stock

2 tablespoons of extra virgin olive oil

2 tablespoon of butter

1/2 cup of Parmigiana-Reggiano

1/2 medium onion finely chopped

2 teaspoons of lemon zest

Juice from one lemon

Salt and Pepper

Saute the onion in the olive oil and butter over medium-high heat for about 5 minutes.

Add in the Aborio rice. Coat the rice the the butter and oil and saute for about 3 minutes.

Add in one cup of chicken stock. Continuously stirring until almost all of the the liquid is absorbed; then add in the second cup of stock. Keep stirring until almost all of the liquid is absorbed.

Add in the third cup of chicken stock along with the lemon juice, the lemon zest and the parm. Keep stirring and once the liquid is almost completely absorbed, season with salt and pepper to taste.

There are few things more perfectly simple than Risotto.


Wednesday, June 10, 2009

Dry Rub Grilled Chicken

Most of you know by now that I like to grill. I just love to be outside, maybe that's why I've taken to grilling. Did you know the homegirlz started their three times a week conditioning for soccer? While they are working out, I have been walking on the walking path. One lap is 1.2 miles and I am up to four laps...that's only because the weather has been so cool in the mornings. I'm sure once the heat and humidity kick in, I will be down to two laps.

Anyway, in order to keep things interesting on the grill, I made a dry rub. I really haven't grilled with dry rubs at all...once maybe. This rub really turned out fantastic; the whole family raved about it. Dry rubs are going to become a staple with grilling in our home.


Start off with 1 cup of brown sugar. This is dark brown sugar. If you have light brown, I am sure that will be fine.


Add 3 tablespoons of dry mustard.

Add 2 tablespoons of garlic powder, 2 tablespoons of onion powder, 1 teaspoon season salt, 1/4 teaspoon cayenne and 1-1/2 teaspoons of smoky chipolte powder.


Thoroughly combine all ingredients. Generously sprinkle on both sides the the chicken and then gently massage the rub into the chicken. Cover chicken and refrigerate for 30 to 60 minutes. Allow chicken to sit out for about 15 minutes before placing on a hot grill.


My baby girl, Scout, was on deck (literally) to supervise.


Initially the chicken was seared for about five minutes, each side then moved and cooked with indirect heat for approximately 40 minutes.