Monday, April 4, 2011

French Onion Soup

I am in the process of doing a cookbook review and did I hit paydirt with this book, Simple Suppers by Jennifer Chandler.  Have any of you checked out this book?   It is loaded with great recipes; so much so, I couldn't choose which ones to try.

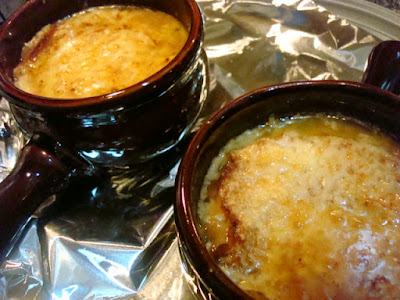
Kaitlin picked out two she really wants me to make and I will post them.  Jennifer's French Onion Soup recipe was calling my name.  I've been looking for a good French Onion Soup recipe and this was was amazing!

So simple to make, A.J. is still talking about it.  This French Onion Soup recipe is now an Aucoin family favorite.  It has a wonderful but not poverpowring onion flavor and a gooey, cheesy topping.  How could anyone turn down something so comforting no matter if the weather is cold or just a little bit chilly out?

Check out the picture of the soup from the book!
 Talk about food porn.  The picture first enticed me, then I read the list of ingredients and the cooking method and was sold.

Okay enough babbling, let's cook some French Onion Soup.


Cast of Characters:

1/2 cup unsalted butter
6 cups thinly sliced yellow onions (about 4 large onions)
2 cloves garlic, minced
2 bay leaves
2 sprigs fresh thyme
2 tablespoons cognac
1 cup dry white wine
3 tablespoons all purpose flour
8 cups beef stock
Kosher salt and freshly ground black pepper
1 baguette, thinly sliced into at least 8 rounds
1-1/2 cups grated Gruyere cheese


In a large stockpot or Dutch oven over medium heat, melt butter.  Add onion, garlic bay leaves, and thyme and cook, stirring often, until soft and caramel colored, bout 20 to 30 minutes.


Add cognac and cook until the liquid is almost evaporated, a bout 2 minutes.  Add the white wine and simmer uncovered until the wine has almost evaporated, about 8 minutes.  Dust the onion mixtures with the flour and stir to coat.  Cook until thickened, about 2 minutes.


Pour the beef stock and raise heat to high.  Bring the mixture to a boil .  Lower the temperature to medium and simmer uncovered, until the flavors have melded, about 15 minutes. 


Season with salt and pepper to taste, discard the bay leaves and the thyme sprigs.


Preheat the broiler.  Toast the bread lightly.  Ladle the soup into ovenproof bowls.  Top each bowl with 2 slices of the toasted bread and 1/4 cup of cheese.  Broil until the cheese is melted, about 3 to 5 minutes.


Serve hot, enjoy, smile and moan and watch the face of sweetie light up as he enjoys this comforting treat!

I'll post a couple more from this book this week.


Sunday, April 3, 2011

Product Review - Zevia

Jack Follman is doing PR for Zevia and was kind enough to send a couple of samples to me me to sample.

In case you havent' heard of Zevia, Zevia is the first and only brand focused on a great tasting, all natural, zero calorie soda sweetened with stevia, today reveals a new can design and the launch of five new flavors to its existing variety of seven. New flavors include Grape, Mountain Zevia, Grapefruit Citrus, Caffeine Free Cola and Cream Soda. The new Zevia cans come in bold colors that capture the flavor of each variety on http://www.zevia.com.


Zevia is the No.1 carbonated beverage in natural products stores nationwide, and aims to remind consumers “what soda should always have been.” It is a delicious alternative for soda drinkers and diet soda drinkers looking for beverage options without sugar, calories and artificial sweeteners. The line of sodas is sweetened with stevia, a South American plant that does not affect blood glucose levels or contain calories. The new flavors are 100 percent natural formulas that are vegan, Kosher and gluten-free.


Jack sent caffeine free cola and black cherry cola to us.  A.J. got into the cola not knowing it was a big no-no.  He's not one to ever, ever drink a diet soda.  This has to be a big testament to Zevia since he enjoyed the cola and didn't know it was a "diet" soda.  Kaitlin ans I tried out the black cherry soda.  The taste was smooth and refreshing.  The black cheery flavor was clean.  No evidence of that "diet" soda aftertaste in this beverage.

Check out Zevia's website and look for there beverage in the many flavors they offer at your local grocer!


Friday, April 1, 2011

Cheesy Everything Beer Bread

We've had a long winter, lots of snow.  Check this out:


I call this, "Embrace the Redneck".  What's worse, this was my idea.  A.J. could run the lawnmower and keep the homegirlz occupied.  Meanwhile I am the redneck...snap! 

On this particular day I made bread, a coconut pie and lobster pot pie and this delicious bread.  I only have pictures of the bread.  On a cold day like this you have to be mighty fast with the camera and I wasn't fast...I was eating lobster pot pie.  My bad.

But I do have bread to offer and this is so mighty good bread with a nice chewy crust.  Get out the butter and let's bake some bread!

3 cups All-purpose Flour - You can do 1-1/2 cups of Wheat Flour and 1-1/2 cups AP Flour, if you like
1 tablespoon plus 1 teaspoon Baking Powder
1 teaspoon Salt
1-1/2 teaspoons Dry Mustard
12 ounces Beer (you choice)
2 cups Shredded Extra Sharp Cheddar Cheese
2 - 4.5 ounce cans Green Chiles, chopped, including the juice

Topping:

1 teaspoon Sesame Seeds
1 teaspoon Poppy Seeds
1/4 teaspoon Kosher Salt


Preheat oven to 425 degrees. Grease a loaf pan with shortening.

In a large bowl, sift the dry ingredients together. Add the green chiles, cheddar, and beer. Stir until combined (a fork will work well). The batter will be very thick. Use a spatula and scrape batter into the loaf and spread out evenly. Sprinkle the seeds and salt over the top. Gently press them into the batter using your fingers or the back of the spatula.


Lower the oven temperature to 400 degrees. Bake for 45-50 minutes until a toothpick comes out clean from center.


Cool on a wire rack  for about 15 minutes and then remove or turn out from pan and allow to further cool.  Just between you and me this is the perfect time to sample...send the kids and your spouse outside with the riding lawnmower and a sled, arm yourself with a plate, and a butter knife...use your imagination!

Have a great weekend!


Thursday, March 31, 2011

Potatoes Au Gratin...with Gruyere'

If you are a parent, you may remember those days when your children SLOWLY phased out of the "terrible two's" into "brain damaged teenagers".  Somehow along the way, did you lose the idealistic views you held dear before you found out your first bundle of joy was on his or her way.  In the spirit of keeping it real, I did; ok, I admit it, I lied like a cheap rug to my youngest so I could use MY computer to blog.  Hello, my name is Katherine and I am a blogger. 

I have a mission.  Yeah, that's it, I have a mission, a duty if you will, to share with all of you the good stuff.  Seriously, the only reason you come here (which I am so VERY grateful), is because GOOD counts not calories or that little aggravation called cholesterol.

Even though I live up in the mountains in East Tennessee, I do subscribe to and even read on occasion Bon Appetit magazine.  Today I am sharing one awesome potato au gratin recipe. 


Ingredients:

3/4 cup plus 2 tablespoons heavy whipping cream
1 large garlic clove, peeled
1 1/4 pounds russet potatoes, peeled, cut into 1/8-inch-thick rounds
1 1/2 teaspoons chopped fresh thyme
1/4 cup whole milk
1/2 cup coarsely grated Gruyère cheese

Directions:
Place oven rack in center of oven and preheat to 350°F. Butter 9-inch-diameter glass pie dish. Place pie dish on rimmed baking sheet. Combine cream and garlic in small saucepan and bring to simmer over low heat. Cover and remove from heat.


Arrange 1/3 of potato rounds, slightly overlapping, in concentric circles in prepared pie dish; sprinkle with 1/2 teaspoon thyme and season lightly with salt and pepper. Pour 1/4 cup garlic cream over. Repeat layering 2 more times with remaining potato, thyme, salt, pepper, and garlic cream. Pour remaining garlic cream over, then 1/4 cup milk.


Sprinkle cheese over.


Bake gratin until golden on top and potatoes are very tender, 1 hour to 1 hour 10 minutes. Let potato gratin rest 10 minutes before serving.

So in the end, one day, my children will become responsible adults and bless me with grandchildren and I will knowingly smile as I see them go through..whatever, who cares just pass the potatoes.
P.S.  Someone told me that when you cut the potatoes, the calories leak out.  The world is full of possibilities.

Tuesday, March 29, 2011

Death by Sloppy Joe!!!!

First,  thank all of you for your warm "Welcome Backs!" and emails.  I am trying to get back to routinely blogging.  All of your words mean so much; saying thank you lacks so much as far as how much your words and thoughts mean.

I can offer back by sharing this Sloppy Joe recipe.  It's dangerously good, wickedly addictive and will seduce you before you have a chance to reach for a napkin.  If you're laughing and thinking,"Yeah right, whatever.", I dare you! This is so worth it.

Start off with the sauce:

2 tablespoons canola oil
1 medium yellow onion, coarsely chopped - if Vidalias are in season, use a Vidalia
4 cloves garlic, coarsely chopped
1-1/2 cups ketchup
1/2 cup water
2 tablespoons McCormick's Mexican Chili Powder or ancho chili powder
1 tablespoon paprika
2 tablespoons Dijon mustard
2 tablespoons cider vinegar
1 tablespoon Worcestershire sauce
1/2 tablespoon Chipotle Powder
1/4 teaspoon cayenne
2 tablespoons brown sugar (light or dark)
1 tablespoon honey
2 tablespoons molasses
Kosher salt and freshly ground black pepper to taste

Heat the oil over medium-high heat in a high-sided skillet or large saucepan. Add the onions and cook until soft, 5 minutes. Add the garlic and cook for 1 minute. Add the ketchup and the water and bring to a boil. Reduce the heat and simmer for about 5 minutes. Add the remaining ingredients and simmer until thickened, stirring occasionally, about 10 minutes.   Move to a cool burner and get busy with browning the meat.

1 tablespoon canola oil
2 pounds lean meat
Kosher Salt and freshly ground black pepper
1Poblano Chile, diced
1/2 Jalapeno Pepper, minced
ALL of the Awesome BBQ Sauce Cooling on the Stove
1 teaspoon Worcestershire sauce
2 Tablespoons chopped fresh flat-leaf parsley


Brown ground meat, season with salt and pepper to taste.  Once ground meat is evenly browned, drain all excess fat and stir in remaining ingredients except for the parsley until thoroughly combined.  Lower heat to simmer and allow to simmer for about 10 minutes.
Ok, this is what puts these Sloppy Joe's over the top!!

Toasted Garlic Buns:

1/2 stick butter
2 cloves garlic, peeled and mashed

Once BBQ sauce is removed from burner to cool, place butter in a small skillet over low heat along with smashed garlic.  The garlic will infuse the butter.  Keep the burner on the lowest heat possible.  Brush garlic flavored butter on buns and place the buns while the meat and sauce are simmering.  Place the buttered buns on a baking sheet.  Put the baking sheet with the buns under the oven broiler until the buns are slightly browned around the edges.

Now, let's put these babies together and munch.

Top toasted buns slices with some of the Sloppy Joe mixture, sprinkle with or parsley and top with cheddar, provolone or pepper jack cheese.


Remember, lots of napkins and lots of burping is totally acceptable!

I dare you!!


Friday, March 18, 2011

Molten Lava Cake

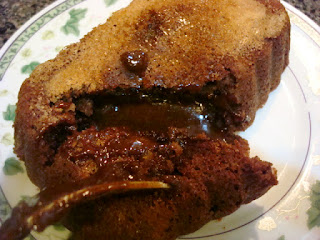
Yes, a picture is worth a thousand words.  Why waste time telling you how decadent and good this molten lava cake is.  The picture says it all.   I do have to say this though, quick, easy, YUMMY!

2 sticks butter
4 teaspoons sugar
1/2 teaspoon ground cinnamon
Pinch cayenne
Pinch nutmeg
1/2 teaspoon espresso powder (optional)
12 ounces semisweet chocolate, chopped
1 cup all-purpose flour
2-1/2 cups confectioners' sugar
6 large eggs
6 large egg yolks
1-1/2 teaspoons vanilla extract
1/2 teaspoon almond extract

Preheat oven to 400 degrees F.

Prepare 8 (6-ounce) ramekins with either butter, shortening or cooking spray and sprinkle each with about 1/2 teaspoon sugar.

In a saucepan combine butter, cinnamon, cayenne, nutmeg, and chocolate over low heat until melted and smooth; stirring frequently.  Remove from burner and set aside to cool slightly.

In a large bowl whisk together flour, confectioners' sugar, eggs and yolks, vanilla extract and almond extract until creamy. Add melted chocolate to the batter and whisk together.

Pour into prepared ramekins.

Bake cakes until the top is stiff and cracked and the edges are dark, about 12 to 14 minutes. Remove from the oven and let cool for 5 minutes. Loosen the edges of the cake with a small paring knife then invert onto plates while warm.

I've learned there are two kinds of people in this world.   People that adore gooey chocolate and those that won't admit it.  Which one are you?


Wednesday, March 16, 2011

Quiche That Even a Real Man Will Eat

There's nothing like a quiche.  Think of all of the possibilities; the combinations of flavors and cheeses.  Besides all of the possibilities, quiches are quick and easy and just the ticket on a busy weeknight. The to put it over the top, I happened to catch Paula Deen making a quiche with a hash brown crust!  I am so there baby!

The homegirlz ask for this quiche all the time now and now I have a dirty little secret to share.  A.J. doesn't know it's a quiche, we told him it's a casserole.  You see, A.J.'s motto is, "Real men don't eat quiche".  They do now, but don't tell him...ignorance is bliss; at least in our house it is.

To get started, here's what you'll need:

*Remember, you can change out the sausage for crab meat, ham or whatever you're craving!

3 cups, shredded frozen hash browns, thawed and drained
4 tablespoons (1/2 stick) butter, melted
3 large eggs, beaten
1 cup half-and-half
3 breakfast sausage patties, cooked and crumbled
1/2 cup diced green onions
1 cup shredded cheddar cheese
Salt and black pepper to taste

Preheat your oven to 450 degrees.


Press the drained hash browns between paper towels to dry them as best as possible. In a 9-inch pie plate, toss the hash browns with the melted butter into the plate. Press them into the bottom and up the sides to form a crust. Bake for 20 to 25 minutes until golden brown and starting to crisp.


While the hash brown crust is baking mix the rest of the ingredients in a large mixing bowl.  Once the hash brown crust is ready, pour the egg mixture in the crust and return it to the oven. 


Lower the oven temperature to 350 degrees F and bake for about 30 minutes until the quiche is light golden brown on top and puffy.


So much better and lighter than pie crust.  Give it a try!