Showing posts with label Beef. Show all posts

Wednesday, April 17, 2013

Three Envelope Roast and More 2013 East Tennessee Blogger Get Together Details!!

I saw this recipe a while back at WeGottaEat and couldn't resist giving it a try.  This has to be one of the easiest and tastiest roast beef recipes.  Your family will sing unending  praises and request it often!

Here's the cast of characters:

1 envelope of onion soup mix
1 envelope of Au Jus mix
I envelope of Italian Salad Dressing mix
1 cup of water and 8 ounces of your favorite salsa

Plus a 2-1/2 to 3 lb. roast


Line your slow cooker with a slow cooker liner, they make for EASY clean-up!  Pour all of the ingredients in the slow cooker.


Whisk everything until completely blended.


Place your roast in the slow cooker and cover tightly.


Cook for 8 to 10 hours.  (Hint: Get this ready right before heading out  for work and when you get home, dinner is waiting on you!).


Walk away and let the magic happen!


Hello gorgeous!


Remove the roast from the slow cooker and allow to cool for about 10 minutes.  Look how tender and juicy!  This roast will literally fall apart and I have no idea how I was able to get it to the platter without it falling apart.


While the roast is cooling, prepare your sides.


Tell this doesn't make your mouth water!

Ok kids, get your calendars out and let's talk 2013 East Tennessee Blogger Get Together!!!

We are doing a Hawaiian Luau themed get together this year.  Larry, Chris and I are still up in the air about whether we are doing a whole pig this year, but I can tell you pork will be involved!

Date:  Sunday, May 26, 2013 Rain or Shine

Time:  Noon until whenever everyone leaves.  We will eat around 1:30 PM

Who:  Anyone who is willing to make the trip is welcome and of course, bring your significant other!

Where:  Larry's place on Tellico Lake which is about 35 miles southwest of Knoxville, TN.

As I mentioned, we will be serving Hawaiian, Island fare.  We will be asking for a small donation (approximately $10 per person) to cover the cost of the meat.  We won't know exactly how the donation will be until we have a final attendance count.

We will provide tea and soft drinks but please feel free to BYOB.

RSVP: To Larry grandpop1@yahoo.com by May 5, 2013.

Final directions will be provided to the individuals who RSVP they are attending.

Larry, Chris and I are are getting really excited because this little get together we started back in 2010 has grown every year and we have always had a wonderfully memorable time.  So mark you calendars and plan on joining us for a good time and good food with your blogger friends


Pin It

Wednesday, March 13, 2013

Grillades and Grits


So what in the world are grillades (gree-yads) anyway?  

Many of you may think of New Orleans as a big seafood town and it is but it is also known for it's meats.  It all started when butchers started moving to New Orleans from the Gascony regions of France.

These butchers, as well as their decendents, monopolized the butcher market in New Orleans well into the 20th century.  Their influence provided a wide variety of meat cuts including the grillades, according to "New Orleans Cuisine. 14 Signature Dishes and Their Histories".

In the late 1880's grillades appeared on almost every brunch menu in the city. The "Sailors Breakfast" was first cooked in modest homes and was eventually served in the most affluent homes as well.

Also, the brunch concept started in New Orleans for the City's dock workers because most of them finished work around 10:00 AM and they still wanted breakfast.  So the boarding houses near the docks created a second breakfast and capitalized from the dock workers hearty appetites.

This recipe is adapted from Emeril Lagasse in his Commander's Palace days.

2 lbs. Chuck tender cutlets or Beef Top Round, about 4-inches in size
3 tablespoons Emeril's Essence or your favorite Cajun seasoning
1/2 cup All-Purpose flour for dredging
4 tablespoons Canola Oil
2 tablespoons butter
1 cup onions, chopped
1/2 cup celery, chopped
1/2 cup green bell peppers, chopped
1/1/2 tablespoons garlic, minced
4 ounces sliced button mushrooms
3/4 cup white wine (I used Pinto Grigio)
2 cups beef stock
2 bay leaves
1 teaspoon dried thyme
1 teaspoon Kosher salt
1/2 teaspoon cracked black pepper
1/4 teaspoon cayenne
1/2 teaspoon dried oregano
Baked Gruyere Grits (recipe follows)

Place the beef cutlets between two pieces of wax paper.  Using a meat mallet or heavy skillet, pound the meat to tenderize and break up some of the connective tissue.   Season the meat generously with Essence on both sides and then dredge through the flour.

Pre-heat oven to 350 degrees F.

Heat 2 tablespoons of Canola oil in a large cast iron skillet over medium high heat. Once the oil is heated add the floured beef, working in batches and adding more oil as necessary, just be careful not to overcrowd the skillet and steam the flour off.  Brown the meat about 3 minutes each side, until golden brown.

As the beef browns, transfer it to a platter and set aside.  Once all of the beef is cooked, add the butter to the skillet.  when the butter has melted, add the onions, celery, bell pepper and mushrooms to the pan.  Saute the vegetables until soft, about 7 to 10 minutes.  Add the garlic to the skillet and cook for 1 more minute, then add the wine to the skillet and reduce by half, about 3 to 4 minutes.  Scrap the brown bits from the bottom of the skillet while the liquid is reducing.

Stir in the beef stock, bay leaves, thyme, oregano, salt, black pepper, and cayenne to the skillet.  Bring to a boil, return the beef tot he pan, lower the heat to a simmer.  Cover the skillet and place in the oven and allow to cook for 1-1/2 hours, stirring occasionally until the beef is fork tender.  

When beef is tender remove from the oven, adjust the seasonings if necessary and serve over Baked Gruyere Cheese Grits.

While the beef is braising in the oven, get the grits started:

6 tablespoons butter, divided 4/2
4 cups water
1 teaspoon salt
1 cup Quick Cooking Grits (not instant)
1 egg
1/3 cup heavy cream
1 teaspoon black pepper
1 cup Gruyere cheese, grated
1/2 cup Parmesan cheese, grated

Grease a 2-quart casserole dish with 2 tablespoons of butter.

In a medium, heavy sauce pan, combine the remaining 4 tablespoons of  butter, salt and water over medium high heat.  When the mixture comes to a simmer add in the grits, stir to thoroughly combine.  Lower heat to medium and continue cooking the grits until thick and creamy, about 7 minutes, but can take as long as 15 minutes.

While the grits are simmering, in a medium bowl, whisk together the egg, heavy cream and black pepper.  Stir this into the cooked grits.  Note: at this point, I really thought the egg would curdle, but it didn't, so don't worry about tempering. Once combined, pour mixture into prepared casserole dish, top with the grated Parmesan and Gruyere cheeses and place in the 350 degree oven the beef is braising in and cook for 45 minutes.  Remove from oven and let stand for about 5 minutes.


So whether you're a dock worker or a high society bruncher, you now know about Grillades and Grits!  Everyone should, don't you agree?


Pin It
Friday, September 21, 2012

Kickin' Meatball Sliders

It's football time again and between cheering for our local high school football team on Friday nights, getting caught up in Vol fever while the University of Tennessee was featured on ESPN's Game Day last Saturday or cheering for my hometown team, the New Orleans Saints, a girl can not have too much delicious, hearty food on hand.

4 tablespoons extra virgin olive oil divided
1 lb. lean ground beef
1 lb. mild Italian sausage, removed from casings
1 teaspoon red pepper flakes
6 cloves of garlic, rough chopped (divided 4 and 2)
1/2 cup Panko bread crumbs
1/2 cup freshly grated Parmesan
2 large eggs, whisked
1/4 cup chopped fresh parsley
1 - 28 ounce can tomato puree
1 cup red wine (I used Cabernet Sauvignon)
1 teaspoon oregano
1 teaspoon granulated sugar
1 bay leaf
1/2 teaspoon basil
Kosher salt and black pepper
Asiago cheese, shaved (figure 3 shaved strips per slider)
Slider buns or soft, small dinner rolls, sliced in half
Fresh basil leaves


in a large bowl, combine the ground beef, Italian sausage, red pepper flakes, 2 cloves of chopped garlic, Panko crumbs, grated Parmesan, eggs, parsley and salt and pepper to taste. Form  into meatballs about the size of golf balls.

Heat 2 tablespoons of olive oil in a skillet and brown the meatballs on all sides.  


You will probably have to brown the meatballs in batches.  Once browned, move the meatballs to a paper towel lined platter.

To make the sauce, heat the remaining olive oil in a large sauce pan over medium-high heat.  Add the onions and saute for about 3 to 4 minutes.  Then add the remaining chopped garlic and saute for another minute.  Add in the tomato puree  and once it begins to bubble, add in the wine, stir to thoroughly combine.  Allow the sauce to gently simmer for 5 minutes then add the oregano, sugar, bay leaf, basil and salt and pepper to taste. 

Carefully add in the browned meatballs, cover and simmer for 45 minutes to 1 hour.  Adjust seasonings if needed.  I wound up adding in a little more garlic powder and some grated Parmesan cheese. 


To assemble your slider, place two meatballs in a bowl and very slightly flatten then just a bit with the back of a large spoon.  Place the meatballs on the bun bottom and ladle on some sauce.  Top with a couple of slices of the shaved Asiago cheese and a basil leaf.

Let me tell you, the basil leaf really added a certain "sumthin'-sumthin'" to this slider.

Score!  these sliders are definitely a touchdown!!!


Pin It

Thursday, July 19, 2012

Meatball Casserole

When I do find the time to make Spaghetti and Meatballs, it pains me to see any of it go to waste.  Even with the influx of lots of teenagers practically eating us out of house and home this summer, I had way too many meatballs leftover from this weekend to allow to go to waste.  Let me ask you this, doesn't hungry and teenager go hand in hand?  

After a Monday that was REALLY a "Monday", I threw this together.  This was the ticket and the best part, well actually there were two best parts...no three best parts...I had no leftovers, we all loved it, I had everything and didn't have to make a trip to the grocery store!

If you don't have leftover meatballs, buy a bag of the frozen meatballs and use a jar of your favorite spaghetti sauce.  Also, if you don't have the Johnny's Garlic Spread Seasoning, instead make a blend of 1/2 teaspoon salt, 1/4 teaspoon black pepper, 1 teaspoon garlic powder, 1/2 teaspoon onion powder, 1/2 teaspoon grated Parmesan cheese and 1/2 teaspoon dried basil.

2 cans crescent roll dough
1 block (8 oz.) of light cream cheese, softened
1-1/2 to 2 lbs. leftover meatballs (depending on size, cut in half or quartered)
3 cups spaghetti sauce
2 cups shredded Mozzarella cheese

Pre-heat oven to 350 degrees F.


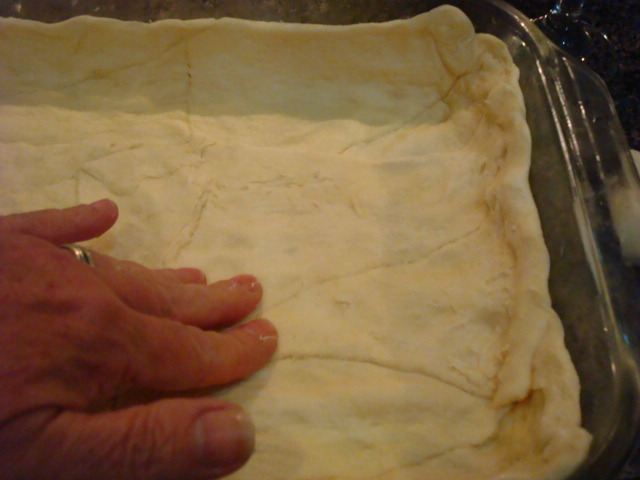
Lightly spray a 9x13 baking dish with non-stick coking spray.  Unroll the crescent roll dough and press into baking dish, covering bottom of dish and pressing it half way up the sides of the dish.


Place the cream cheese in a small bowl and mash it with a fork.  Add in the Johnny's and thoroughly blend it in the cream cheese.  Spread the cream cheese in a thin layer over the crescent roll dough.  I found it easier to spread it out with my fingers than using a spatula.


Combine the meatballs and spaghetti sauce in a large bowl and the carefully pour or spoon it over the cream cheese and dough.


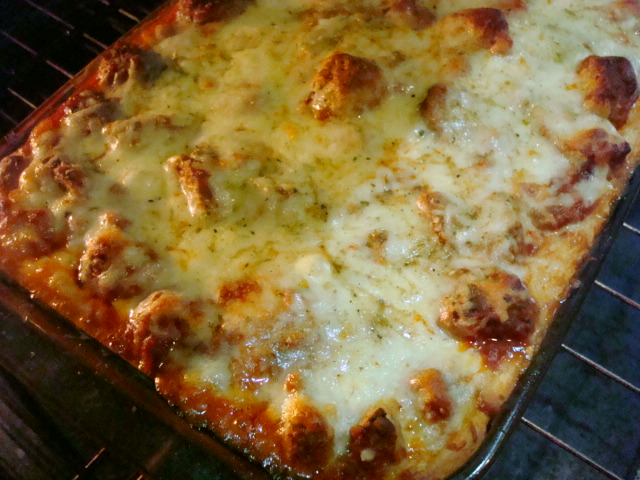
Sprinkle the shredded Mozzarella cheese over the top and pop that baby in the oven for about 30 minutes or until the cheese is melted and the sauce is bubbly.


Yum, melted Mozzarella cheese wrestling! Is that a sport?


If I don't get my fair share there will be some serious yelling going on!


I am so glad pictures of melty, stringy Mozzarella cheese are against the law (yet).


Pin It

Wednesday, June 20, 2012

Slow Smoked Brisket


imageLet's face it, my husband is a spoiled, spoiled man.  Believe me he knows it!  How many wives would prepare a smoked a brisket for Father's Day?  That's right kids, I didn't take him out to a restaurant to enjoy brisket or grill hot dogs or take the other easy way by slapping this baby in the oven, No I did it the real boss, hoss way over coals in my trusty little Weber grill. 

Don't be scared, because this was so easy thanks to McCormick Grill Mates Products.  See this little envelope of "Smokin' Texas BBQ" rub?  It's really a magical envelope of brisket love.  Because of this little envelope, I was able to spend an afternoon leisurely multi-tasking...smoking my brisket and spending time with my husband and children in the backyard on a gorgeous Sunday afternoon.  And then, oh yeah baby, enjoy a fabulous brisket dinner with literally no clean-up!

First, before we get started, the first rule I learned when I became interested in learning to grill was grill maintenance and safety.  The one sure way to spoil any meal is to start off with a dirty and ill-placed grill.

If you are a seasoned master of the grill or are interested in grilling, place your grill in an area away from your house or out buildings, away from children play areas and an area free of clutter.  

Always start off with a clean grill.  Dirty grills can cause fires and not only ruin the taste of your food, but can make you, your family and your guests extremely ill.  

So Rule Number One, place your grill in an area clear from hazards and keep your grill C-L-E-A-N!

1 - 3.75 lb. beef brisket, trimmed.
1   envelope of McCormick Grill Mates Smokin' Texas BBQ rub
1   high-sided foil pan large enough to accommodate the brisket
Aluminum foil
Several handfuls of mesquite wood chips soaked in water for several hours


Rub in the McCormick Grill Mates Smokin' Texas rub on all sides of the brisket.  Place the seasoned brisket in the foil pan and tightly cover with a sheet of aluminum foil.  Refrigerate overnight.  Keep the brisket refrigerated until you are ready to place it on the grill.

In order to smoke/cook the brisket low and slow, it should be placed on the grill grate cold and not at room temperature.

Light the charcoal and keep the coals to one side of the grill and place the brisket on the opposite side of the grill to cook it slowly over indirect heat. 

Once the coals are lit, sprinkle some of the mesquite chips over the coals.  Ideally, I was trying to keep the temperature on the grill between 275 degrees F and 300 degrees F, which for the most part I was able to maintain.  In the very beginning, temperature on the grill spiked at 350 degrees F.  After closing off one of the vents a little to slow down how fast the fire was burning the coals, and adding a small pan of water on the grill, the temperature gradually dropped and I was able to maintain a temperature of 280 degrees F the remainder of the cooking time.

Was the foil pan for later use.

I checked on the brisket after one hour to check the grill temperature and to add more wood chips.  After 2 hours, I turned the brisket and continued to cook it for 2 more hours.  After the 4th hour, the internal temperature on an instant read thermometer read 160 degrees F which is what I wanted. 


The brisket was then placed in back in the clean foil pan along with the small pan of water and tightly covered with aluminum foil.  I add more lit coals and wood chips as the temperature on the grill was beginning to drop and continued cooking the brisket for another 1-1/2 hours. 
After removing the brisket from the grill, I placed the pan on a cooling rack and left it covered to allow it to rest for one more hour. 


This brisket cut like butter, was so moist and flavorful.  The McCormick Grill Mates Smokin' Texas BBQ rub was sensational!

So don't forget to stop by McCormick's Grillerhood and become a part of the a growing grilling social network!

Share with all of us your number one "Rule of Grilling"! 

Disclosure - I have been compensated by McCormick in all relevant communication mediums, including without limitations on Facebook, Twitter, any blog posts.


Pin It

Thursday, January 19, 2012

Nacho Mama's Skillet Nachos

Sometimes you just need something fun and easy for dinner.  These skillet nachos ran the whole gamut for us - fun, easy to prepare, a breeze to clean-up, not to mention the whole family was excited and anxious for dinner to be ready.

I kept this real simple since I have some very picky eaters.  If left to my own devices, I definitely would have added sour cream and homemade guacamole or maybe even a chimichurri sauce.  


1lb. lean ground beef
1 bag restaurant size lime flavored tortilla chips
1 packet taco seasoning
3/4 cup water
1 jar medium salsa
2 cups Monterrey Jack cheese, shredded
2 tablespoons sliced scallions
2 tablespoons sliced black olives
1 tablespoon taco sauce

Preheat oven to 325 degrees F

This is best done in a cast-iron skillet.

Brown ground meat over medium heat and drain off excess fat.  Return skillet to burner and sprinkle taco seasoning over meat, add water and stir to combine.  Bring to a boil, reduce heat and simmer for approximately 10 minutes.  Place meat in a bowl and reserve.

Wipe the skillet clean with a paper towel and line the bottom and sides of the skillet with the tortilla chips.  Spoon the reserved meat into the skillet over the tortilla chips lining the bottom of the pan.  Spread meat out evenly.  Spoon the salsa over the meat and then place a layer of the Monterrey Jack cheese on top.

Place the skillet in the oven and bake for approximately 7 minutes, until cheese is almost completely melted.  Sprinkle the scallions and olives over the cheese and then drizzle the taco sauce over the scallions and olives.  Bake for another 3 to 4 minutes until the cheese is completely melted. 


Allow to rest for 5 minutes before serving.


Spoon out a serving or just place the skillet on the table and devour.


Friday, January 13, 2012

Philly Cheese Steak Sammich


It's amazing that little mundane things that a lot of us don't think about twice, will amaze and make the person you think you know the best so very happy.

Shortly before Christmas a new convenience store opened a couple of blocks from our house.  If you're in this area, it's a Weigels.  A.J. is thrilled and looks forward to stopping  there everyday and twice on Sundays.  Hey, I was happy because he was happy.  He called me one morning as I was leaving the house for work to tell me  I HAD to stop at Weigels and get one of their stuffed biscuits.  So I did, it was pretty good, a lot lighter and less breadier than biscuits from the fast food joints. 

Several days later he said, "You have to try their stuffed Philly Cheese Steak Sandwich, talk about on time."  I told him I've never eaten a Philly Cheese Steak before and he thought I was joking but seriously, it never appealed to as a "must try".  I tried and I REALLY liked!

Since I haven't had a Philly Cheese Steak before, especially from Philly, please don't hop on me because it's not authentic, but do try it because baby, it totally rocks!

2 lbs. lean sirloin sliced very thin
Olive oil
McCormick's Montreal Grill Seasoning
Kosher salt and freshly ground black pepper
Butter
2 tablespoons all-purpose flour
1-1/2 to 2 cups beef broth
6 Hoagie rolls
Creamy Cheesy Sauce, recipe follows
8 ounces sliced mushrooms
1 medium sweet yellow onion, sliced into thin strips
2 Poblano peppers, de-seeded and sliced into thin strips.  Cut about the same length as the onion
Heat skillet over medium-high heat. Add 1 tablespoon of olive oil to skillet.

Place all of the steak slices in a large bowl.  Sprinkle with grill seasoning and drizzle with olive oil.  Toss the meat with your hands to evenly coast with olive oil and seasoning.  Once the skillet is heated cook steak slices about 45 seconds to 1 minute per side.  You will have to do this in batches, don't over crowd the skillet.  You just want to brown the meat.  Place the meat in another bowl and reserve.

Put the skillet back on the stove and add 2 tablespoons of olive oil and 1 tablespoon of butter.  Once the butter begins to foam, add the flour and stir constantly to cook off the flour for about five minutes.  Slowly add in the beef broth 1/2 cup at a time.  You want it a little bit thicker consistency than the broth, but not a real thick gravy.  Once you get the consistency you want, season with salt and pepper.  Add the reserved steak slices, along with all the juice that settle in the bottom of the bowl.  Move the steak slices around to get them covered with the gravy.  Cover, lower heat to simmer and toss them around about every 15 to 20 minutes until you're ready to assemble the sammiches.

In another skillet heat 2 tablespoons of olive oil and 1 tablespoon of butter over medium-high heat.  Once the butter has melted add in the mushrooms.  Cook the mushrooms for about 4 or 5 minutes and try not to move them around too much.  Add another tablespoon of butter and add the onions and toss them around a bit with the mushrooms and cook another 4 or 5 minutes just until the onions begin to caramelize on the edges.  At this point add 1 tablespoon of olive oil (if needed) and the Poblano peppers.  Continue cooking until the mushrooms are golden brown and the onions are caramelized.  Season with Kosher salt and freshly ground black pepper.

While you're working the veggies you can get the creamy cheesy sauce going.  I saw Rachel Ray make a similar sauce for mac-n-cheese and thought it would work for this too.
1 tablespoon butter
1 tablespoon all-purpose flour
1 cup milk and 1 cup half-n-half, heated
1 cup grated or sliced provolone cheese
1/2 cup grated Asiago cheese
1 teaspoon kosher salt
1/2 teaspoon white pepper or freshly ground black pepper

Pour the mil and half-n-half in a heat safe cup and warm in the microwave.  Melt butter in a medium saucepan over medium heat. Vigorously stir or whisk in the flour and cook for 3 minutes. Slowly stir or whisk in the warm milk.  Cook, stirring constantly until thickened, about 5 minutes. Remove the saucepan from the heat and whisk in the cheeses until combined.  Season to taste with salt and pepper.

To assemble, place several slices of the meat on the bottom half of the roll, spoon some of the cheese sauce over the meat, and top with the mushrooms, onions, and peppers.


So now I have one more thing to scratch off the bucket list.


Wednesday, August 17, 2011

Hot Diggity Dog! A Cure for the Summertime Blues!

I'm not going to lie, sometimes I really like a gooooooood hotdog!  Grilled of course!  Buuuuuutttt....I wanted to experiment; that's just a part of the magic of me.

The homegirlz were game once I threw in words they knew, like taco and pizza.

So this is what we did:

The Taco Dog:


We grilled some dogs and flour tortillas.  (Just place the tortillas on the grill for 2 to 3 minutes and turn when you're satisfied with the grill marks and/or doneness.)  We also put an assortment of fixin's; a blend of grated cheddar and Monterrey jack cheeses, diced onions, black olives, jalapenos, sliced green onions, and taco sauce.  Put out whatever you like on a taco.


I slathered on some taco sauce, topped the dog with onions, cheese, black olives, and green onions.


We actually rolled the dogs burrito style.  The flavor was amazing, they were light.  I liked them much better than using a hot dog bun with all the bread. 


About two weeks later, we tried these:

Pizza Dogs:


I infused some butter with garlic and drizzled it on the bun.  We then  placed grilled dogs on the buns and ladled pizza sauce over the dogs and sprinkled a combination of grated Parmesan and mozzarella cheese on top.  The dogs were placed under the broiler until the cheese was sufficiently melted.


The pizza dogs were good, but my favorite no question -  the taco dogs.  The homegirlz concurred.

So when you have the summertime blues or you just want to change things up....go for it, who knows, you may may see Hot Dog Cordon Bleu or Hot Dog Carbonara on here sometime!


So tell me, really, who let the dogs out?


Friday, August 5, 2011

New York Strip with Goat Cheese Crumbles

I know that a good steak can stand on its own.  But...sometimes I just feel the need to change things up a bit.   The fresh, tart taste of goat cheese turned these goat cheese crumbles into a fantastic steak dinner my sweetie and I shared.  It's so quick and oh so very simple!

2 tablespoons goat cheese
1/4 cup Italian style bread crumbs
1 teaspoons Herbs de Provence
1-1/2 teaspoons olive oil, divided
2 New York Strip steaks (rib eyes, filet mignon or sirloin cuts will work great too)
Salt and freshly ground black pepper
1/2 cup dry sherry
1 cup beef stock
1 clove garlic, pressed
1/4 cup onions, diced

Preheat oven to 400 degrees F. Line a baking sheet with foil, spray with non stick cooking spray and  set aside.


In a small mixing bowl, crumble goat cheese and combine with bread crumbs, Herbs de Provence, and 1/2 teaspoon of olive oil; set aside.


Add 1 tablespoon olive oil to a large skillet and heat over medium-high heat. Season steaks with salt and pepper place in skillet. Sear 1 to 2 minutes per side just to brown. Top with a pat of butter, remove skillet from heat.  Us e a pair of tons and carefully place steaks on prepared baking sheet.


Top each steak with half of the goat cheese crumbles. Finish cooking steaks in preheated oven for 4 minutes for medium-rare, 6 minutes for medium, and 8 minutes for well done.


Return skillet to the stove and deglaze with sherry.  Scrape the browned bits from the bottom of the skillet.


Add the beef broth, garlic and onions and bring to a boil over medium-high heat. Reduce liquid by half.


Remove steaks from the oven and let sit for about 5 minutes before serving to allow juices to re-distribute.


Serve steaks with the sauce ladled over the top.

So sublime!  Have a wonderful weekend!