Wednesday, January 14, 2009

London Broil with Goat Cheese Chive Sauce

In my visits to food blogs since the beginning of the new year, it has become evident that many of you are trying to lose some weight. Guess what? I am too...I've lost 5 lbs. so far but I still have a ways to go.

This blog does not exist to dole out weight loss tips or make you stray from your plan, BUT if you are trying to lose weight run far, far, away from here right now. The rest of you keep reading.


I'm on a sauce kick and I don't know why. I found a sauce for vegetables and chicken last week, now I'm moving on to beef.


I cooked this lovely London Broil Sunday night generously crusted in grill seasoning, seared over screaming high heat on the stove and then gently baked in the oven. Slightly thin slices make this very economical for a family of four and we still had leftovers.
This simple sauce blend along with the intense crusted seasonings on the beef make my taste buds boot scoot boogie all over the place!


In a small sauce pan bring 1-1/2 cups of heavy cream to a gentle boil over medium heat. Keep an eagle eye on the pan so the cream does not boil over. Stir occasionally, the cream will reduce after about 20 minutes. At this point, add a small tube (about 4 oz.) of goat cheese. This particular time I used a flavored goat cheese, but plain is just fine. Once the cheese has melted, season to taste with coarse sea salt and white pepper (Black pepper is fine, I used white pepper to keep the sauce color from changing) and 2 tablespoons of chives. Ladle over sliced beef and you'll know why I am on a sauce kick!


Tomorrow is the Cafe's one year anniversary, I can't wait to show what we're going to make.

Tuesday, January 13, 2009

Apple and Sausage Breakfast Bake

Have I got a treat for you! What kind of a friend would I be if I didn't share this with you?
I don't know what to call this, so for simplicity, I'm calling it a Apple and Sausage Breakfast Bake.
A couple of months ago when we were guests of my brother and his wife, my sister-in-law Chele, prepared a dish similar to this using cranberries. I did not get to watch her preparation process but I did pay attention to a few things and came up with this.
My family was over the moon with this breakfast bake and I thought it was a nice change from the usual breakfast fare.
The best part of this is you can prepare it the night before then sachet into the kitchen the next morning and serve a piping hot healthy breakfast without breaking a sweat. I do sachet, did I ever tell you that? Also, it contains three of major food groups, sausage, sour cream and cheese. How can you go wrong?
Let's get some breakfast vittles going!
Preheat your oven to 325 degrees and spray an 8x8 oven safe dish with non-stick cooking spray.


Whisk 6 eggs in a medium bowl.


Add approximately 1/3 cup low fat sour cream and 1 cup of 2% milk, 1 teaspoon vanilla, 1 teaspoon salt and whisk to thoroughly blend.


Cut up a package (6 patties) of breakfast sausage into bite-sized pieces.


Take 12 slices of cinnamon swirl or cinnamon raisin swirl breakfast bread and cut into bite sized pieces.


I have a confession...with a hot cup of coffee by your side it's hard not to pick. So drink tea.


Peel and core one apple (I used a Granny Smith - I like the tartness and they hold up well with baking) and cut up into bite sized pieces. Add to the apples 1 tablespoon of ground cinnamon and 2 tablespoons white granulated sugar. Toss the apples pieces in the cinnamon sugar combination.


Line the bottom of your baking dish with a layer of the bread cubes.


Add a layer of sausage and apples and, and, and...


A layer of grated sharp cheddar cheese. Are you drooling yet? You'll need about 2 cups of shredded cheese. Repeat with another layer of bread, sausage, apples and cheese. Pour the milk/egg mixture over the casserole, cover and refrigerate for at least two hours, but better yet over night.
Bake at 325 degrees for 45 to 60 minutes. Be sure to check on this at 45 minutes. The bread will puff up and it may overflow in your oven and the last thing I want is a big mess in your oven. I do care; I almost had a big mess in my oven.


Remove and let stand for about 20 minutes so you don't burn your tongue. I got anxious and burned my tongue. I know, I'm pitiful.


Hey beautiful, where have you been all my life?


Monday, January 12, 2009

Pizza!

My youngest daughter Kaitlin, sat me down one evening last week. She told me she missed the meals I used to make all the time for dinner. She asked me to start incorporating some of her favorites into my weekly rotation.
I missed some of the meals I used to make for them too. They used to help in the preparation in a lot of these meals. Pizza is one such dish. I don't have any pictures of either of the homegirlz making their pizzas. They made me promise not to take any pictures of them and I had to honor their request. We had a blast making pizzas Friday night.
A couple of fun things about making pizza at home is you are only limited by your imagination and everyone can make their pizza their way; there's no right or wrong.
I've posted this dough recipe before when I made Garlic Knots
This is a very easy and delicious pizza dough recipe.

Pizza Dough -

1 cup warm water (105 to 115 degrees F)1 envelope active dry yeast1 teaspoon honey2 tablespoons extra-virgin olive oil2-3/4 cups all-purpose flour1 teaspoon salt, yellow cornmeal, for sprinkling the baking sheet

In a large bowl, combine the water, yeast, honey, and 1 tablespoon oil, stirring to combine. Let sit until the mixture is foamy, about 5 minutes.

Add 1 1/2 cups of the flour and the salt, mixing by hand until it is all incorporated and the mixture is smooth. Continue adding the flour, 1/4 cup at a time, working the dough after each addition, until the dough is smooth but still slightly sticky. You may not need all of the flour.
Turn the dough out onto a lightly floured surface and knead until smooth but still slightly tacky, 3 to 5 minutes.

Oil a large mixing bowl with remaining olive oil. Place the dough in the bowl, turning to coat with the oil. Cover with plastic wrap and set in a warm place to rise until doubled in size, about 1-1/4 hours.

This makes dough for 1 (15-inch) pizza.

We made a standard red sauce pizza with pepperoni, mushrooms, bell pepper and red onion.


Lauren, my oldest daughter said, "Mom, you HAVE to make these everyday for us to eat!".


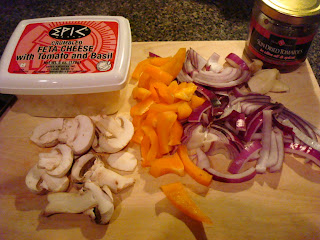
These are some of the ingredients I like on a pizza.


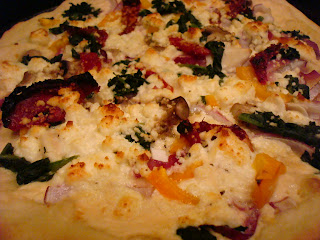
Brush the pizza dough with extra virgin olive oil. Spread roasted garlic Alfredo sauce on the pizza in lieu of red pizza sauce. This pizza was garnished with 1/2 cup thawed frozen spinach, 4 or 5 cloves of smashed garlic, sliced red onions, sliced orange bell peppers, sun dried tomatoes, mushrooms and feta cheese flavored with tomato and basil. YUM!!!!


Lightly grease pizza pan and sprinkle pan lightly with corn meal. Bake at 425 degrees for approximately 15 minutes.

I do want to eat this every day!


Thursday, January 8, 2009

Seared Cicken Breasts with Lemon Cream Sauce

Peter from Kalofagas - Greek Food & Beyond inspired this dish. Peter posted a mouth watering Seared & Braised Breasts of Chicken recipe a couple of weeks ago. I had all intentions of staying with the game plan, but as usual when I start chopping and pulling ingredients out of the refrigerator, I find things like lemons and mushrooms and start tossing them in the pan.

This is the product of Peter's inspired dish.


Season four chicken cutlets with coarse sea salt and white pepper. Dredge in all-purpose flour.

Heat a large skillet over medium heat, and add on tablespoon of extra virgin olive oil. Once the oil is heated add one bunch of chopped scallions and 1/2 lb. of sliced cremini mushrooms sear until they begin to turn brown. Remove the scallions and the mushrooms from the pan with a slotted spoon and set aside on a plate lined with absorbent paper towels.

Add another tablespoon of extra virgin olive oil and sear chicken cutlets golden brown on both sides and set aside.

Discard the oil and place your skillet back on medium heat and add the 1/2 cup of dry white wine and and simmer for 1-2 minutes while scraping up the brown bits. Add 1/2 cup of heavy cream, 1 cup chicken stock, 1 bay leaf, 1/2 teaspoon lemon zest, juice from half of a lemon and 1/2 teaspoon dried thyme and and gently bring to a boil. Carefully add your chicken cutlets back into the skillet and lower heat to simmer uncovered for about 15-20 minutes or until your sauce has thickened enough to coat the back of a wooden spoon. Add the reserved scallions and mushrooms and blend into the sauce. Adjust seasoning with salt and pepper and discard the bay leaf.

Spoon some cream sauce onto the bottom of each plate and then add a layer of ziti cooked al-dente and ladle cream sauce over ziti and crown with the chicken cutlet. Garnish with some shaved Parmigiana-Reggiano.

This is one top-shelf dish bursting with the bright flavor of lemon and thyme.

Thanks Peter for the inspiration!


Wednesday, January 7, 2009

Sauce for Green Beans

Have I got a treat for you! It's this sauce! I was thumbing through River Roads Recipes, my old friend, my standard, looking for my favorite no fail hollandaise sauce recipe. Below the hollandaise sauce recipe, I found a recipe labeled "Sauce for Broccoli". In the spirit of "trying" to eat a tad more healthy, I thought it would be fantastic on steamed green beans and it was.

This has a much thinner consistency than hollandaise but the burst of taste is amazing but it is also delicate enough that it does not overpower the wonderful flavor of the green beans. I strongly recommend trying it on your steam green veggies of choice.

Sauce for Green Beans -


2 tablespoons real butter
2 tablespoons extra virgin olive oil
1-1/2 teaspoons Worcestershire Sauce
1 teaspoon Dijon mustard
1 tablesppon vinegar ( I used Apple Cider vinegar)
Dash of red pepper

Combine all ingredients except butter in a small sauce pan. Add the butter and heat slowly, stirring occasionally until butter has melted. Pour over steamed veggies. Enjoy!


The sauce gently coated the beans, but the majority of it went to the bottom of the dish.


I took this picture so you could get a closer look at the sauce.


I hope you try and enjoy it as much as I did!

Tuesday, January 6, 2009

Chicken Salad with Maple Dressing

Picture a chilly, dreary, rainy Monday; the first day back to school for the homegirlz and the first day back to work for their mother after the Christmas holidays. Mom arrives home from work, the house is dark and strangely quiet, both girls are sound asleep.
This was the scenario yesterday at our house. I tried to wake the girls but I could not stir them. I've been a little under the weather since New Years Eve, and really did not feel like cooking. I decided to take advantage of this opportunity and prepare one of my favorite salads.

This is a simple combination of iceberg and romaine lettuce, sliced red onion, sliced fontina cheese strips (oh how I love the nutty taste of this cheese), some of Gigi's pecans that I toasted on the stove and some leftover boneless, skinless chicken from the fridge. But this isn't all...

What REALLY makes this salad feel so warm and cozy is the salad dressing. It goes so well with the toasted pecans and the nutty fontina cheese. Warm over low heat about 1/4 cup of real maple syrup on the stove. Pour the warm syrup into a measure cup and add 2 tablespoons of apple cider vinegar and whisk in some extra virgin olive oil to taste. Now pour this delectable dressing over your salad and enjoy with a glass of wine.
You'll sleep really well, I promise!

Monday, January 5, 2009

Baked Cornish Game Hens

It sure seems like everyone had a wonderful Christmas and New Year! Hopefully I can get back on track with posting.


I cooked cornish game hens for Christmas dinner. Unfortunately, I do not have a lot of pictures of this dish. It did get a little hectic in the kitchen which I'm sure most of you understand since it was probably like that at your house.

The method I used to prepare these cornish hens made way for a fall off the bone tender, juicy and really tasty treat! I cooked five game hens, but depending on the size of the Dutch oven you use, you may be able to cook six at one time.


Wash each of the hens thoroughly inside and out, remove all of the debris from the inside cavity. Pat them dry with paper towels and set them aside. Heat a Dutch oven (5-quart size) on the stove to medium-high heat. Pour in 1/4 cup of peanut oil and heat it until it begins to "ripple". The oil needs to be at least this hot in order to sear the game hens, and seal in their juices.

While the oil is heating, generously season the hens with salt, black pepper and red pepper, onion powder, garlic powder, poultry seasoning, and dried basil.

One or two at a time, lower the hens into the hot oil and fry them down until they are richly browned all over (be extra careful that you don't tear the skin). Once browned, remove them from the pot and allow them to drain on several sheets of paper towels.

After browning all of the hens, immediately drop into the Dutch oven immediately 2 cups of sliced oyster mushrooms and fry them down until they too reach a golden-brown color. Then add in 2 cups of diced onions onions, 3/4 cup of diced bell pepper, and 6 cloves of garlic mashed and fry down these seasonings until they wilt, soften, and pick up the rich brown color of the mushrooms.

And here is where this dish really comes together! While continually stirring the pot, drop in the 1/4 cup of parsley finely chopped, 1/2 cup fin chopped green onions, 2 tablespoons Worcestershire sauce, 1/2 teaspoon Kitchen Bouquet, 1/4 cup dry sherry, 1 cup of chicken stock, 2 bay leaves, 1/2 teaspoon paprika, and 1/4 cup all-purpose flour.

Lower the heat to simmer and cook the mixture for approximately 10 minutes, whisking it occasionally to keep the flour from lumping. When the seasoning base is completely blended and smooth, turn off the burner and spoon half of the mixture from the Dutch oven into a heat safe bowl.


Nestle the game hens down into the pot (stand them on their heads, breast-side down and drumsticks up). They should fit and hold each other upright.


Evenly ladle over the game hens the mixture you previously removed from the Dutch oven.
Cover the pot and place it into a pre-heated 350-degree oven and roast the hens until they are tender and basted in their own juices. They should be done to perfection in about an hour and a half.

Notes:

1. The hens create their own juices as they pot-roast, but if you'd like more than what is rendered out naturally you can always stir into the pot a little extra chicken stock after the poultry is cooked.

2. Be careful when removing the hens from the Dutch oven. Chef's spoons work great for lifting them out of the pot.