Thursday, September 18, 2008

Garlic Herb Chicken

My husband grew tomatoes this summer, in fact we are still picking them daily. I am beginning to wonder if this is ever going to end. Don't get me wrong, I am glad his two tomato plants are producing, but he's the only one in our family that eats tomatoes raw. The female portion of the household loves catsup, tomato sauce, pizza sauce, etc., but please don't let a raw tomato slime our salad or sandwich.
I gave a load of tomatoes to one of our neighbors who knows of my aversion to the raw product. She diced, seasoned and stewed the tomatoes and returned them to me in a jar. the jar was still warm when he handed it to me and of course I couldn't resist opening it and let me tell you, the smell was out of this world. I had to use those tomatoes in a dish tonight!!!
Garlic Herb Chicken -
Boil 1/2 lb. penne pasta in salted water and drain.

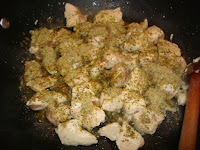
Rough cut 1 package of chicken strips into chunks, season with salt and pepper and brown in a skillet with 2 tablespoons of extra virgin olive oil for about 3 minutes.

Then season with 2 teaspoons dried thyme leaves, 1 heaping tablespoon dried sweet basil and 2 tablespoons minced garlic. Dried herbs are more concentrated than fresh and give this dish a little more depth.

Add a jar or 16 oz. can of diced stewed tomatoes with Italian seasonings and combine.

Add a really generous handful of grated Parmesan, a little drizzle of olive oil and you're in business for a great meal!

Take a plate to your neighbor!

Tuesday, September 16, 2008

Banana Pecan Bread

Fall is in the air and it's time to take the bull by the horns and bake some Banana Pecan Bread. These little loaves are packed full of flavor and are great for breakfast, brunch or late night munchies! You can even deliver them to your friends during the holidays. I can't wait, let's get started!
Banana Pecan Bread -
Preheat oven to 350 degrees. Melt 1-1/2 sticks of butter and let cool. Lightly spray two 8 x 4 loaf pans with non-stick cooking spray.

In a large bowl, combine the 2 cups of all-purpose flour, 1-1/2 teaspoons of baking soda, and 1/2 teaspoons salt; set aside.

Mash 2 over-ripe bananas with a fork in a small bowl so they still have a bit of texture; set aside.
Using an electric mixer fitted with a wire whisk, whip 2 other over-ripe bananas and 1 cup of sugar together for a good 3 minutes; you want a light and fluffy banana cream.
Change mixer to batter paddle and add the melted butter, 2 room temperature eggs, and 1 teaspoon pure vanilla extract; beat well and scrape down the sides of the bowl.
Mix in the dry ingredients just until incorporated.
Fold in 1/2 cup chopped pecans...
... and the mashed bananas with a rubber spatula.
Pour the batter into the prepared loaf pan. Give the pan a good rap on the counter to get any air bubbles out.

Talk about make your home smell gooooooood while it's baking! Bake for about 1 hour, until golden brown and a toothpick inserted into the center of the loaf comes out clean. Don't get nervous if the banana bread develops a crack down the center of the loaf; it's normal. Cool the bread in the pan for 10 minutes or so, and then turn out onto a wire rack to cool completely before slicing.
Serve with a light dusting of confectioners' sugar.

Friday, September 12, 2008

Honored


Lanny at Lagniappe honored me with this award. She is originally from Louisiana and is a regular visitor to my blog. Lanny's blog is a very interesting and sweet blog with lots of humor. Stop by and visit Lanny's blog. You'll also see really cute baby pics from her blessed new addition to her family.

So here's the rules:
*Choose 5 bloggers that you feel are kick-butt bloggers.
*Let them know.
*Link back to Mammadawg.
*Link back to the person who gave you the award.

I'm awarding this award to:
Prudy- her constant encouragement and because gave me my first award.
Marjie -she amazes me daily...check out her blog!
Michele -she shares fabulous recipes and great stories.
Greg - his stories will split your sides and yes, Greg you are always right!
Aggie -I'm a freak for Italian food and her blog makes me drool!

Like Lanny, I could list pretty much all of the blogs I stalk...tough pick narrowing it down to five.


Great BIG Thank You Lanny!


Thursday, September 11, 2008

Chocolate Pots de Creme

April at Abby Sweets gets credit for this dessert that is just too good for words. This is one of the easiest desserts to prepare and a definite keeper for your dessert arsenal. You can make it with different types of chocolate which makes this dessert very versatile. So let's have a French lesson...it's pronounced "Po de Krehem"; but you knew that already. Pots de Creme is nothing but chocolate goodness. One thing I did change from Aprils recipe is I added a bit of strong coffee to the mixture. In my humble opinion, coffee enhances the chocolate flavor. While I was making this, the homegirlz couldn't do enough to help around the house...they were folding laundry, feeding the pup, setting the table. Wow, take out a back of semi-sweet chocolate chips and people get busy in my house! I love it.

Chocolate Pots de Creme -


Mix together eight egg yolks and 1 cup of sugar.


Mix at a low speed until the yellow color becomes somewhat pale.

In a heat-proof measuring cup, add 1/2 cup of milk and 1/2 cup of heavy creme. Heat to boil in the microwave and very slowly incorporate to the the egg mixture.

Add to the mixing bowl, 1-1/2 cups of melted semi-sweet chocolate chips with 1/2 cup of strong coffee or espresso.

Pour the chocolate mixture into ramekins, place ramekin into a baking pan and fill the baking pan halfway up the ramekins with water. Bake at 350 degrees for 30 to 40 minutes. Since my ramekins were not shallow, the baked for 40 minutes. A shallow ramekin would probably take about 30 minutes.

Let them cool, then place in the refrigerator to chill for at least 2 hours.

Garnish and enjoy. One note...make an extra one for you and stash in the back of the fridge - hey you can always do Pilates later!

Thanks April!!!!!!

Wednesday, September 10, 2008

Roasted Broccoli

I am going to try and share the emotions that I feel everytime I taste these simply delicious roasted broccoli florets. Roasted broccoli has a nutty taste, very different from steamed and raw versions. Right now our grocery store has piles of broccoli at a really great price. Sometimes it's hard to know what to do with broccoli besides steaming it or covering it with cheese. So grab some broccoli from the grocery and make this quick and easy side. Hey, it's broccoli, you can feel good about serving it to your family and have fun watching their faces squirm when they see you grab it from the fridge.

Roasted Broccoli -
Pre-heat your oven to 425 degrees. Rinse and drain the broccoli stalks and cut off the stalks. You want florets with very little stems. Place the florets on a baking pan lined with foil and spray with non-stick cooking spray. Season the broccoli with 1 tablespoon of grill seasoning (preferably McCormick's Montreal Grill Seasoning), 1/4 teaspoon red pepper flakes and about 2 to 3 tablespoons of extra virgin olive oil. Toss the florets with your hands to evenly coat the the seasonings and olive oil. Bake for 20 to 25 minutes until the florets are tender and slightly brown.
Your family and friends will become broccoli believers.

Tuesday, September 9, 2008

Chicken Pastina

Have you seen the mini pastas the grocery stores are selling? I learned from an Italian friend that the mini pasta is called "pastina". The mini pastas cook a little faster which is great when you're in a little bit of a hurry. I used the mini farfalle (bowtie), you can use your favorite pasta shape and size. This is the easiest, most awesome and quick chicken dish that will wow your family and friends. It's pretty economical too!
Chicken Pastina -


Chop one medium onion and 2 tablespoons flat leaf parsely.


Cube one package of chicken tenders. Cook 1/2 lb. of mini pasta to al-dente in salted water. Butter a 9x9 baking dish.


Add 1/4 cup extra virgin olive oil to a medium saute pan over medium heat. Add the chicken and cook for 3 minutes. Add the onions and 2 cloves minced garlic, stirring to combine, and cook until the onions are soft and the chicken is cooked through, about 5 - 7 minutes more.


Pour chicken mixture into buttered dish add 1 14.5 oz. can of diced tomatoes (with juice), 1 cup, 1 8 oz. can of tomato sauce, 1 cup mozzarella cheese, parsley, salt, and pepper to taste. Stir to combine.


In a small bowl mix together 1/4 cup Italian bread crumbs and 1/4 cup grated Parmigiano-Reggiano. Sprinkle over the top of the pasta mixture. Dot the top with small bits of butter.
Bake in a pre-heated 400 degree for about 20 minutes to melt the cheeses and then place under the broiler for a minute or two until the top is golden brown.

Friday, September 5, 2008

Kick-Off Steak Sandwich

First, I want to thank all of your for your well-wishes for the folks affected by Hurricane Gustav. Our family members are all safe and it seems they suffered little damage so far. Let's hope the three storms still out there spin out in the Atlantic and don't cause any harm.
Soccer has consumed my free time. I spent the last two weekends at tournaments and taxied people to and from practices and games all week. I need to win a gas card bad. Last night I FINALLY got to cook and we did sandwich night. This wasn't any ordinary sandwich night; I wanted to put it over the top. I missed my knife and cutting board, I missed my pots and pans...not really, well kind of...so while I was supposed to be working yesterday afternoon, I zoned out and came up with this Kick-Off Steak Sandwich...I think it's a wonderful idea for a football game too!
Kick-Off Steak Sandwich -


Start off with a package of Gruyere cheese. A little note here, this cheese is a little pricey, but when you see what we do with it, it goes a long way. Gruyere is a Swiss cheese imported from, you guessed it Switzerland, and it has a stronger taste than domestic Swiss cheese.

Cut off the rind.

Cube the Gruyere and place in a food processor using the cutting blade. Add about 2 tablespoons of Dijon mustard and freshly ground black pepper and a pinch of salt. Be careful because the Gruyere is slightly salty...you can leave the salt out if you're not a salt person.

Pulse the food processor until the cheese is completely broken up. While the machine is running, stream in about 1/4 cup of extra virgin olive oil. You will wind up with a thick, but spreadable, palate pleasing mixture. Set this aside and keep at room temperature.

We're going to roast an Anaheim pepper. These peppers have a little fire to them, and are a lot like a bell pepper. Place the pepper on the grill or under the broiler in your oven. You want to char the outside skin of the pepper.

Keep a close eye on the pepper and turn as each side begins to char.

Once all sides are evenly charred. Remove pepper from grill and place in a PAPER bag, close bag and let the pepper steam for about 10 minutes. (Sorry this was the smallest paper bag I could find) I have visited several cooking blogs that instruct you to place roasted peppers in a re-sealable plastic bag. PLEASE use PAPER. There's a good chance the plastic will melt onto your temperature hot pepper...gross!

Remove the pepper from the bag so you can peel the outer layer of the charred skin.

The charred out skin peels off so easy. You can use this method to roast just about any kind of pepper.

You can use any cut of steak you like; I used a sirloin that I caught on sale. Brush steak with extra virgin olive oil on both sides and season with Montreal Steak seasoning. Grill until you've reached your desired doneness. Thinly slice the steak.

Okay, now for the bread. I used Chibatta bread. It has a thin crust and is light and airy on the inside. With steak, I didn't want to use a heavy bread. Melt one stick of butter over very low heat, add 2 cloves of crushed garlic to infuse the butter with garlic flavor. (I started this before I started the cheese mixture.) Cut the bread in half sandwich style and brush the inside of the bread with the garlic butter and place butter side down on the hot grill for about 30 seconds.

Mmmm, I can't wait to put these sandwiches together!

I put the two pieces of bread together and cut into 4 equal portions. Spread the Gruyere cheese mixture on the bread, place your steak slices, top with the grilled peppers and a few pieces of spicy arugula and you have a sandwich that will please all of your homies!

GO SAINTS GO!