Friday, May 29, 2009

French Vanilla Cupcake Surprise

Kaitlin, my baby and recent graduate and I were home alone yesterday afternoon. I enjoy being able to spend one on one time with the homegirlz.

Kaitlin is becoming quite the baker and I am thrilled she is letting me post this. The deal breaker was no pictures of her.

The cupcakes are VERY good. A few of her friends came by while she was baking and camped out until the cupcakes were done. I'm telling you the whole house smelled amazing! I was lucky to get a picture of the cupcakes...these were the last three left!

So let's get busy with French Vanilla Cupcake Surprise

Grease the muffin cups of one muffin tin with shortening.

Bake one box of French Vanilla cake mix using the cupcake package directions. Fill the cups 3/4 full. Allow the cup cakes to completely cool.

In a food processor combine one 8 ounce tub of mascarpone cheese, 1/2 cup strawberries, 1/4 cup sugar, and 1 tablespoon of lemon juice. Pulse until smooth. Spoon the mixture to a pastry bag fitted with a small tip. Push the tip gently into the bottom of a cupcake and squeeze about 1/2 to 1 teaspoon in the strawberry mixture into the cupcakes.

Pour 2 cups of powdered sugar into a medium size bowl and set aside. Then in a small pot bring 1/2 cup sugar, 1/4 cup of water, and 1 teaspoon vanilla extract to a simmer over medium heat. Simmer until the sugar is dissolved. Combine the syrup with the powdered sugar. Stir until smooth.

Very quickly. spread the icing on the top of the cupcakes. The icing firms up very fast.


Now, I need to learn how to move pictures around with this new web browser.

Have a great weekend!

Thursday, May 28, 2009

Chicken Piccata

Whew, what a crazy day! I finally installed Firefox and am a lost ball in tall weeds. I can't move my pictures around this has slowed me down a lot and not making me happy. Kaitlin is helping me with while she's back and forth in the test kitchen making some kind of special cup cakes that she is going to allow me to post! They sure do smell good.

I really don't know if this is a real Chicken Piccata or not. I saw Tyler Florence (I hear ya Donna!) making Veal Piccata. That day I had chicken cutlets thawing for Chicken Parmesan. What intrigued me the most was his method of coating the veal. He floured it first, then dipped it in the egg wash then into the pan. This method really changed the texture and taste of the finished product.

When I got started, I decided I needed certain ingredients that his recipe didn't call for and lightened up just a bit. I know Marjie identifies with me on this. So here's my version of Chicken Piccata:


Season both sides of chicken cutlets with salt and lemon pepper. Pre-heat a high-sided skillet with 2 tablespoons of extra virgin olive oil. Also bring a large pot of salted water to a boil and boil 1/2 lb. of your favorite pasta. I used gemelli pasta this time.


Dredge the cutlets through flour seasoned with salt and pepper.


Dip the floured cutlets in an egg wash also seasoned with salt and pepper.


Brown the cutlets for about 4 minutes each side in pre-heated skillet.


After browning, place a platter and set aside. If you are doing this in batches which is what I did, you may need to add a tablespoon or two of olive oil to the skillet in between batches.


Once the chicken is browned. add two more tablespoons of olive oil to the skillet and add 1/2 red onion chopped and 4 cloves of minced garlic and saute for about 3 minutes.


Add 1 cup of white wine to the skillet and let it reduce by half.


Add 2 tablespoons of capers and 1 tablespoon of freshly chopped parsley.

And the juice of one lemon.

Add 2 tablespoons of butter to the skillet and stir in to thicken sauce. Add the chicken back to the skillet for about 2 to 3 minutes to re-heat it.

Spoon pasta onto plate along with a chicken cutlet. Ladle a generous amount of sauce over chicken and pasta. Garnish with fresh parsley and grated Parmesan cheese.

Wednesday, May 27, 2009

Herb and Cheese Foccacia


I am still having Blooger issues. I still cannot view or comment on Reeni's blog, Cinnamon Spice and Everything Nice and Mary's blog, One Perfect Bite. Hopefully Blogger will have these issues resolved very soon.

My youngest homegirl graduated from 8th grade last night. She's on the right with her older sister. I told her when she was three to stop growing. She didn't listen.
Now she's about one inch taller than me and she's passed up her older sister. I'm thinking that I'll keep her home so she can reach things for me. Congratulations Kaitlin. You are a beautiful and talented young lady and I know you will go far in life.
The best way to drown the sorrows of your children getting taller than you and starting to spread their wings...warm, cheesy bread! Not just any warm and cheesy bread but warm cheesy foccacia infused with lots of herbs.
My first foccacia recipe came from Marjie at Modern Day Ozzie and Harriet and I made it over and over because it's just that good. I've morphed it a little bit and have come up with this.
Add 1 tablespoon of extra virgin olive oil to a large bowl and set aside.
In the bowl of a stand mixer, using the dough hook attachment, mix together on low to combine, 3 cups of all-purpose flour, 1 packet of yeast, 1 teaspoon of salt, 1/2 teaspoon of black pepper, 1 teaspoon of sugar, 1 heaping teaspoon of minced garlic, 1 teaspoon of dried oregano, 1 teaspoon of thyme and 1 teaspoon of dried basil.
Add in 1-1/4 cup of warm milk (110 to 115 degrees F) and 1 tablespoon of extra virgin olive oil.
Continue to mix together and knead or knead by hand until dough is smooth and elastic.
Transfer dough reserved bowl with olive oil. Roll dough in bowl to coat with olive oil. Cover bowl with plastic wrap and allow to rest and rise in a warm place for about 45 minutes.
Punch dough down and place in a greased baking pan. Gently stretch and pat dough into 1/2 inch thick rectangle.
Brush the top of the dough with extra virgin olive oil. Pour 1 teaspoon of dried rosemary into the palm of your hand and slightly break up the rosemary and sprinkle over the top of the dough. Now sprinkler the dough with 2 tablespoons of grated Parmesan cheese and 1-1/2 cups of shredded mozzerella cheese.
Cover with plastic wrap and allow to rest for about 30 minutes. Bake at 450 degrees for 15 minutes, until golden brown.
No matter how much of this foccacia you make, it will never be enough. It will be gone in about 1.876 seconds. It's delish!
P.S. Spell check isn't working either...so please forgive me.

Tuesday, May 26, 2009

Asian Grilled Ribeye Steak

I hope everyone had a wonderful Memorial Day weekend! We had a wonderful time getting together with my brothers and their families. One of my brothers has a photography blog, My Viewfinder . He snapped lots of pictures and if I know him, he'll post lots photos this week.
Ribeyes are one of my favorite cuts of steaks. I love the marbling which equals taste and tenderness in my book. The marinade is simple and flavorful and the Asian inspiration just adds another dimension when combined with that outdoors flavors obtained from grilling. Try this marinade on pork chops or pork ribs! This is a keeper for summertime grilling.
Let's get started on the marinade -


In a large shallow dish, sprinkle 2 tablespoons of McCormick's Montreal Grill Seasoning.

Add in 1/4 cup of soy sauce. I used Tamari dark soy sauce but regular soy sauce will work fine too.
Now add in 1 tablespoon of honey and 1 teaspoon of red pepper flakes.
Add 2 teaspoons of sesame oil and a little drizzle of vegetable oil.
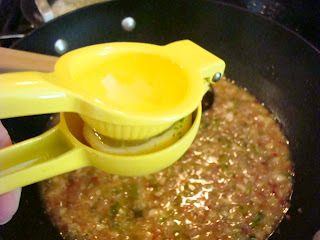
Mix in 2 cloves of minced garlic and 2 chopped scallions.
Place the ribeyes in the marinade and turn to coat. Let them marinate for approximate 10 minutes per side. Then place them on heated grill and discard the marinade.

Grill about 5 minutes per side for rare and about 8 minutes per side for medium rare.


Friday, May 22, 2009

What the H-E-Double Hockey Sticks

I apologize for being absent...isn't it senior skip out day or something?

I have being having problems accessing my blog and accessing a lot of your blogs for comments. From what I understand, it's a Blogger problem and it's supposed to be fixed but it isn't on my end.

Anywhoo, my 8th grade Bebe's (French for BaBay) prom is tonight. We've been busy getting updo's,manicures and pedicures.

Besides, it's Memorial Day weekend and my baby brother has rented a chalet in the Smokies and we're partying away my unemployment woes!


Ok, a 13 year old shouldn't look this sassy! Have a wonderful and safe Memorial Day weekend.

I want to thank every military service person including my brothers, Happy Memorial Day. You are in my prayers and I am forever grateful for your service; thank you for my freedom.


Thursday, May 21, 2009

Garlic and Herb Griled Chicken

One of my favorite things to grill is batches of these Roasted Garlic and Herb Chicken Breasts. You can use this method on any cut of chicken you like, it's just that good! The chicken is basted in a mixture of roasted garlic and herbs, then grilled to perfection. They’re great right off the grill and they are portable, which comes in handy with two teenagers and their friends around. They often grab something to eat when they’re headed out the door. Unlike batter coated chicken, which we enjoy around here, can often mask the true chicken flavor, this grilled chicken simply allows the chicken flavor plus the outdoor cooking flavor to make your taste buds pop.

I almost forgot! They’re totally delicious. Come on…let's fire up the grill.


Squeeze one head of roasted garlic into the blender.


Pour 1/4 cup of white wine into the blender.


Add 2 tablespoons of fresh parsley leaves, 2 tablespoons of fresh basil leaves, 1 tablespoon of honey, 1 teaspoon of salt and 1/4 teaspoon of red pepper flakes.


Pulse blender to combine and then stream in 3/4 of a cup of extra virgin olive oil.


Pour off your basting sauce into a container. Season chicken with salt and pepper and place on the grill. Sear each side of the chicken for about five minutes and then move to indirect heat.

Cook the chicken about 10 minutes per side and then baste with Roasted Garlic Herb Sauce.


Allow to cook another 10 minutes, turn chicken and baste again. Continue grilling and basting chicken until chicken is thoroughly cooked.


Stick in a fork in me, 'cause I'm done!

Tuesday, May 19, 2009

Cheesy Herb Rice Casserole


Rice, *sigh*

Have I told you I live with a family of rice lovers? Have I told you grumblings have been heard around my house, such as, "Oh, pasta again?". "Why don't you EVER make rice?"

It was either this or a total revolt.

This was easier! To be honest, I was surprised how wonderful this rice dish turned out. The flavors were so fresh, it was way more than I ever expected from rice.


This was adapted from a rice casserole dish I saw the Neely's prepare using spinach. I'm the only one that likes spinach, so I had to adapt this to make the troops happy.


2 tablespoons butter, plus more for dish
1 small onion, minced
Pinch cayenne pepper
1/2 cup milk
1 egg
1 cup shredded sharp Cheddar, plus extra for top
2 cups cooked rice
1 teaspoon freshly chopped parsley leaves
1 teaspoon freshly chopped thyme leaves
1 teaspoon chopped basil leaves
2 tablespoons chopped chives
Salt and freshly ground black pepper


Preheat oven to 350 degrees.

Butter a large casserole dish.

In a large pan over medium-high heat, saute onions with 2 tablespoons of butter and cayenne until translucent.

While the onions are sauteing, whisk together milk and eggs.

Add the cheese, rice, parsley, thyme, basil and chives and combine well. Season with salt and pepper.

Pour into prepared casserole dish and top with extra shredded cheese. Bake for 30 minutes and serve piping hot.


This is mine, get your own!


Monday, May 18, 2009

Raspberry Blueberry Tart


This is one amazing cookbook. I won this cookbook in February from Laurie at That's Not What the Recipe Says. I have been pouring over this book for months and wanted to share with you this creamy and decadent tart with a shortbread crust.

Place 2-1/4 cups of all-purpose flour, a pinch of salt and 1/2 cup of packed brown sugar into the the bowl of a food processor. Using the metal blade, pulse a few times to blend the ingredients.


Add two sticks of cold butter, cut into tablespoons size slices and 2 teaspoons of almond extract to the bowl and process for 30 seconds.


Using no more than 4 tablespoons of water, add water 1 tablespoon at a time and pulse. You want to make the dough workable.


Gather the dough into a ball and place it on a work surface.


Divide the dough in half. Roll one of the halves into a disc and cover. Refrigerate or freeze to use later for another tart. Lightly dust the dough with flour and cover with plastic wrap. Place in a tart pan (I don't have a tart pan, so I used a pie dish), use the palm of your hand to press dough into pan.


Bake for 30 to 35 minutes in a pre-heated 350 degree oven. Once crust is baked, allow to cool.


While crust is cooling, prepare the filling for the tart. Mix 8 ounces of mascarpone cheese with 3 tablespoons of powdered sugar and 2 teaspoons of lemon zest.


Spread filling over cooled crust.


Scatter berries over filling - 1 pint of fresh blueberries and 1 pint of fresh raspberries.


Dust with powdered sugar right before serving.
Serve chilled on individual plates or do what I did, just stick a fork in it!